Assessment, Google Apps, Presentation, TLT

#OneNewThing: Creating Infographics Using Google Slides

Infographics are graphic visual representations of information, data, or knowledge intended to present information quickly and clearly. (wikipedia)  For the layman, they can make difficult to understand data or concepts more accessible by delivering only the most important data in an understandable way.  When students are asked to create infographics, it requires them to understand the data and concepts deeply enough to be able to distill them into digestible chunks that a layman can understand.  Because of this, I highly recommend incorporating an infographic assignment into your teaching.


While there are some free applications (Canva.com) that can be used to create infographics, my recommendation is to use Google Slides.  Google Slides is completely free, easy to use, familiar, and the students already have an account!  Here’s how you can do it:

Page Size:

Don’t worry about being restricted to the standard presentation size you see in Google Slides.  You can change the page to be any size you want!

Adding Images:

  • screenshotYou can search the web for royalty free images directly from Slides or you can upload images from your computer (note: Pixabay.org gives you free images to use).
  • You can crop your images into shapes and add shadows and reflections.
  • You can also add a color overlay to some images to make them work for showing a percentage of people for instance.

Add Charts:

  • chart screenshotYou can add charts (pie, line, bar, and column charts) from directly within Slides.
  • You can also connect a chart from Google Sheets that will automatically update when you change the data in your spreadsheet!  Can’t do that in Canva.


Add Diagrams:

You can add anything from an org. chart to a timeline from within Slides as well.  They are professional looking and easy to update.

screenshot of diagrams

Add Shapes:

Shapes can be used to highlight or group text or data areas on an infographic.  Slides offers a wide range of shapes and call outs.

Add Text:

Slides offer a variety of font styles and sizes to meet your needs and the best part is that these will look the same on every computer regardless of the fonts installed on the viewer’s computer, which is critical on an infographic.

Shareable and Collaborative:

Because it’s a Google product it’s easy to share it for group or parter collaboration in creating and easy sharing to turn it in the instructor.

[button link=”https://docs.google.com/document/d/1uK22xphnEWkXn7nMDDn67NvU6cQMz9qcbkSeBVJDZOA/edit?usp=sharing” newwindow=”yes”] Access the tutorials for you and your students[/button]

TLT

Chrome Extensions Part 2 – Tools for Productivity

I am always looking for ways to be more productive and that search has led me to Chrome Extensions.  These are applications that run inside your Chrome browser and enhance the functionality of that browser.  Back in July 2015,  I shared a list of Chrome Extensions that I use and now I would like to add to that list!

  1. Save to Google Drive   The Save to Google Drive Chrome extension helps you save web content or browser screenshots to your Google Drive.
  2. You can shorten a URL with just one click from your Chrome browser with goo.gl URL Shortener    
  3. Read Google Docs and web pages aloud with Read&Write for Google Chrome.  A great tool for multitasking and double checking your grammar. It’s like having a digital proof-reader (or story reader) built right into your Chrome browser.
  4. Awesome Screenshot  for capturing screenshots.  This easy-to-use extension provides great annotation features including text, lines, shapes, highlights, and more.  The clean interface makes creating tutorials and visual aids a breeze with a myriad of screen capturing options including defined selections, delayed capture, and desktop capture.  Save your screenshots directly to Drive, download, or add to your free Awesome Screenshot project library.M
  5. Manage all of your Chrome extensions  with Extensity.  You can quickly access your Chrome extension settings, organize your extensions by category, and disable or enable extensions with one click

Visit Chrome Web Store Help for instructions on how to install and manage extensions.

Easier Paper Grading with Google Classroom
Assessment, Collaboration, Google, Google Apps

Easier Paper Grading with Google Classroom

Hurricane Matthew forced TLT to cancel our session on “Easier Paper Grading with Google Classroom.”  We had several people ask if we could reschedule, so to meet the needs of more faculty we decided to do a recorded version of the class.  Check out the playlist to view the entire session, or click on the three lines in the upper right corner to view specific videos in the series.


6 REASONS TO USE GOOGLE SHEETS
Collaboration, Google, Google Apps, instructional technology, Share

6 Reasons You Should Be Using Google Sheets Instead Of Excel

I have always said that if I could only have two applications on my computer it would be Photoshop and Microsoft Excel. With those two applications I can do almost everything I need to do in a day. Lately, however, my eye has drawn to Google Sheets, and I have to say, I love it.

Now some of you may be saying, “Why do I care? I don’t teach accounting.” Well you don’t have to teach accounting to use spreadsheets in your teaching. They are great for collecting text-based information, running statistics and doing calculations, and graphing and analyzing text or data. So now that you are ready to use spreadsheets in your classroom, here are 6 reasons why you should use Google Sheets instead of Excel.

Reason 1: Collaboration

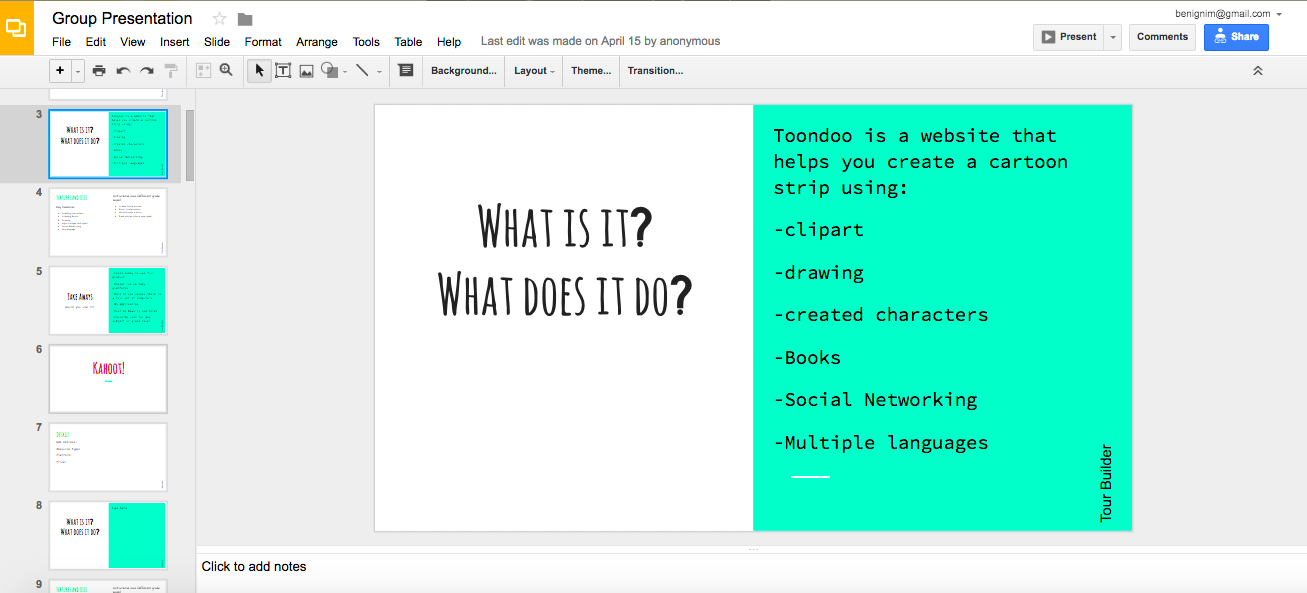
Unlike Excel, Google Sheets is collaborative. All CofC students already have Google accounts so it’s very easy to share a spreadsheet with them or for them to share with one another. When collaboratively editing a sheet each student can see the exact cell that is currently selected all other users, to prevent overwriting. There is also a built-in chat function so students can communicate online while collaborating on a Sheet.

Reason 2: Revision history

Revision History ScreenshotHow many times have you heard, “Student X didn’t contribute anything to the project.” Now you can see exactly who contributed what and when using the Revision History. The built-in revision history gives you a timeline of all changes and additions to the spreadsheet, who made each one and when they made it. Just go to File > Revision History to see this record. The best part? This is all automatically recorded. While you can track revisions in Excel, it’s a more manual process and in the end, still leads to multiple versions and things being overwritten.


Reason 3: Sharing

Google Sheets are easy to share. Because they are already online, Sheets can be shared to OAKS or a website, using a link. These links can be set to allow the users to only view the sheet or to edit it. This is particularly handy if you want to post a spreadsheet in OAKS. Just go to Content and select New > Create a Link and paste in the shared link to your Sheet, making the file easy for the students to locate and easy to work on collaboratively as a class. This is something that can’t be done with Excel (Note: I believe this feature is available in Office 365).

Reason 4: The power of Google

From Alice Keeler, “Because of its tight integration with Google, Sheets can import all kinds of data from other Google services and the web at large. You can translate the contents of a cell using the function GOOGLETRANSLATE(), or you can fetch current or historical securities info from Google Finance with the function GOOGLEFINANCE(). And with Sheets IMPORTFEED and IMPORTDATA functions, you can pull information from the internet directly into your spreadsheet.” (Teacher Tech)

Reason 5: Google Forms

When paired with Google Forms it’s an easy way to collect data. Google Forms, also part of Google Drive (a.k.a. G-suite), allows for quick and easy form creation that professors and students can use to collect data. These forms can be completed by anyone, on campus or off, with or without a Google Account, and the data is dumped right into a Google Sheet. This can be used to replace an audience response system in your class, to check for understanding, to conduct peer evaluation, to collect lab data, etc. Once the data is in the spreadsheet, students can work with the data online or export the Sheet to Excel in order to take advantage of Excel’s more powerful functions and data analysis tools.

Reason 6: Explore with Graphs

explore screenshot
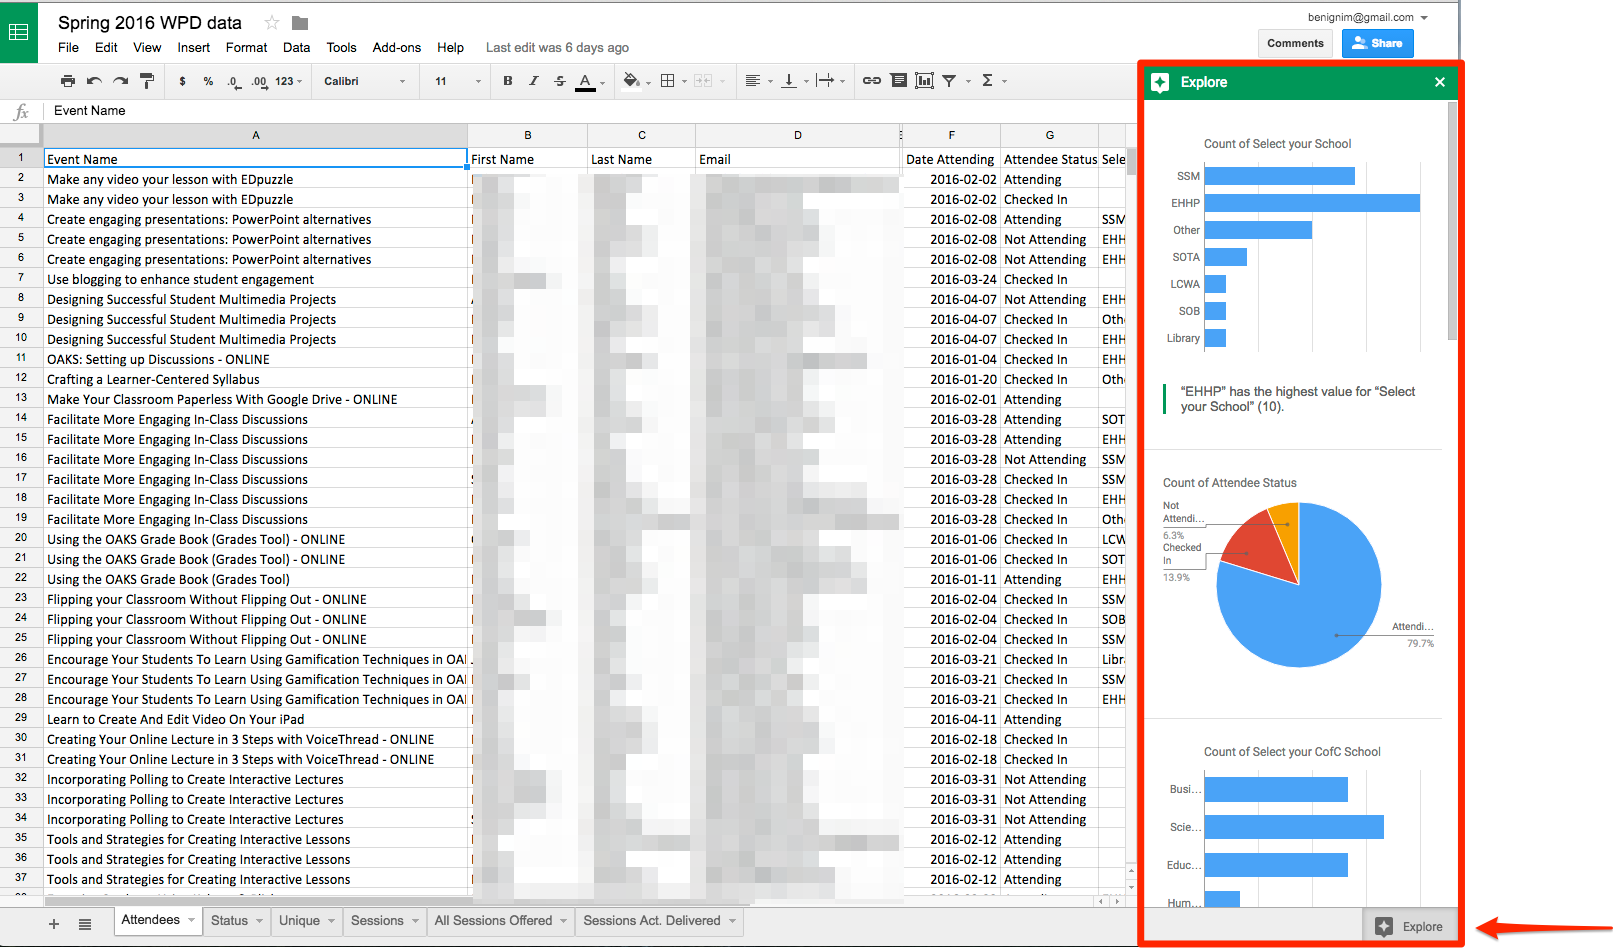
Sheets has a super cool EXPLORE icon in the lower right corner of every spreadsheet. This offers a quick overview of the data in chart format. You can view the entire sheet or just specific rows or columns. It’s a fast way to get a first look at the trends in your data before moving on to your own analysis. Just click on the icon and Google does the rest. Don’t worry, if this doesn’t provide enough analysis you can always create your own graphs, pivot tables, and calculations.  Excel doesn’t have this feature that I can find.


These are just my top 6 reasons to use Google Sheets. I have a ton more. So, can I do everything I did in Excel in Google Sheets? No, I can’t. Excel’s statistical analysis features and functions are still more powerful and probably always will be, but that’s not really what I use spreadsheets for much anymore. Most of the features I used in Excel, like shifting cells, can be done via a Google Add-on, which is a little extension that you can load to increase Sheet’s functionality. Given that, there’s very little need for me to go back to Excel.

Still not sold?

Check out Alicekeeler.com. Alice Keeler is a Google Sheets guru and she always has some amazing cool tricks that you can do with spreadsheets in the classroom. She has written some Add-ons for Sheets that allows you do have more control and automate some processes. Teacher Education folks, you will love her as all of her examples are from her classroom experience.  Check out this one:

Have everyone contribute to their own tab – Give students their own and collaborate. This add-on takes your class roster and automatically creates a spreadsheet tab customized for each student in your class. It can even copy a template to each tab. What a great timesaver!

Small Teaching Tip Number 5 focuses on using Google Docs and Slides to make in-class group work more productive and efficient.
Collaboration, Google, Google Apps, Productivity, Small Teaching Tip, Teaching Advice

Small Teaching Tip #5: Make Group Work More Efficient with Google Apps

Collaboration and project management are important skills for college students to learn.  Unfortunately, many students grumble about group work and faculty spend too much time managing logistics.  Wouldn’t it be nice if there were tools that could make in-class group work more efficient and productive?

I have a possible solution for you!  Google Apps!

All CofC students and faculty have free access to Google Apps for Education using their College email address and password.

Here are two ways you can use Google Docs and Slides to make group work more efficient:

Share Templates

In-class group work is most effective if students are given clear instructions, including the goals of the activity and expectations for a deliverable.  Without purpose or guidelines, students will be less productive and more easily distracted.

One way to provide structure is to create an outline, template, or worksheet to guide students’ work.  If you create this handout in Google Docs, you can easily share it with students who can then type on the document as they work with their teams.

But, Jessica, wouldn’t that mean all students would be typing on the same document?

Yes, unless you make this tiny but powerful change to the document URL: delete the word “edit” from the end of the URL and replace it with the word “copy.”

Sharing clean copies of Google Docs with students

When students click on the URL you’ve shared with them, they will be asked to make a clean copy.  Now, each student or each group can work on their own document.

Ask your students to share their document with you so you can see what they’ve accomplished during class.  And if groups run out of time and need to finish outside of class, every group member can contribute from their own dorm room or apartment (because Google Drive is cloud-based).

Share a Slide Master

After students complete an in-class activity or assignment, do you ask groups to present their work to the rest of the class?  This form of debriefing or “reporting out” encourages students to work harder because they’ll have to stand in front of the room to present to their peers.  It also gives students much-needed opportunities to practice their public speaking skills, which are typically quite weak.

But if you ask students to create slides in Powerpoint, every student would have to email their file or save it to a thumb drive and then open it on the teacher station computer.  This requires too much precious class time.

Instead of using Powerpoint, create an empty slide show in Google Slides.  If you want students to design their own slides, simply create a presentation with blank slides (one slide per student or one slide per group, for example).  If you want students to include certain pieces of information on their slides, create a template.  You can then duplicate that template slide for as many students or groups that you have.

Next, give your students editing rights and share the URL with them (watch the animated GIF below).  Every student can now access that slide deck during class and work on their individual slides.   When it’s time to present to the class, you only have to open the one Google Slides presentation and the entire class’ work is right there!

Changing share settings for a Google Doc


We hope you found this week’s Small Teaching Tip helpful.  This post is part of a series which presents low risk, high reward teaching ideas, inspired by James Lang’s book Small Teaching: Everyday Lessons from the Science of Learning.

6 reasons you should be using Google Slides
Best Practices, Collaboration, Google, Google Apps, Presentation, Productivity, TLT

6 Reasons You Should Be Using Google Slides Instead Of PowerPoint

We all use PowerPoint to create and deliver lectures and for student presentations.  But PPT lacks one major feature…collaboration.   Google Slides, part of our Google Apps for Education, is a PowerPoint-like presentation application that has that collaboration piece, making it more useful in an academic environment.

Here are six reasons you should be using Google Slides instead of PowerPoint.

  1. Consistency — Your presentations look and act the same way on all computers.  Have you ever created a presentation or lecture on your office computer only to have it look or behave differently on the teacher station in the classroom?  With Google Slides, all fonts, images, videos, animations etc. are stored online (in the cloud) so your lectures/presentations will look the same on every computer.
  2. Easy Access — Since both the application and the presentations are saved in Google Drive, it’s easy to access and work on them from any computer or mobile device.   Just log into drive.google.com and you have access to all your presentations, documents and spreadsheets.
  3. Backchannel for Questions — Google Slides has a new Audience Q&A feature which allows your students/audience to ask questions during the presentation.  When activated a web address is automatically added to to the top of each slide allowing the students to ask their questions or make comments.
    screenshot 
  4. Tracking Work in Group Presentations — faculty love group presentations but hate not knowing who did what.  Google Slides has a Revision History section (File > See Revision History) that shows all changes made to the presentation along with who made them.  This is a great way to hold students accountable for a collaborative project.  Because it’s web-based, all students in the group can actively create and edit content within the same presentation at the same time.
  5. Easy Sharing — With one easy trick you can share your lecture presentations so that the students can copy it into their Google Drive and then take notes directly in the presentation Notes area.
    • Open your presentation and click the blue SHARE button
    • Click GET SHAREABLE LINK and click COPY LINK
    • Now paste that link either in OAKS or an email to our students BUT before sending it make one minor change.  At the end of the link change the word edit to copy ex. edit?usp=sharing  /copy?usp=sharing
  6. Efficient In-class Group Work — Create one blank Google Slides presentation and share it with your class.  During the group work each group with create their own slide(s) with their contributions.  At the end of class you have only one file you have to look at and all the groups have access to each other’s contributions.  This also makes it easy to bring the presentation up in class to discuss the group findings.
    screenshot
SAS WRITING REVISER
Google, instructional technology, TLT

#OneNewThing – SAS Writing Reviser

SAS Writing Reviser is a Google Docs add-on that helps to create better writers.  Writing Reviser collects and highlights a multitude of potential flaws in a paper or writing sample and displays it in categories for the writer to review and change if desired.

The goal of the Writing Revisor is to make the writer think about the possible flaws and decide how best to fix them.

–  How It Works

Uses for Faculty & Students

  • Search for and install the SAS Writing Reviser’s add-on in your Google Docs.
  • Open a paper and run the Reviser.
  • Select the category you want to see and watch as all of the items that match that category are highlighted
.
  • Require students to run the report once they have completed their paper or writing project then require them to fix the problems they wish to fix and rerun the report to show their improvement.  The student must turn in the assignment and the report.
  • Students can use it check their writing for common mistakes.  Much more robust than any Microsoft Word features.

Tip:
Start by running the report and working on your top one or two areas of concern.  Working with the entire report is overwhelming.

What it looks for:SAS Writing Navigator - planner, drafter, reviser, publisher

  • Wordiness
  • Prepositional Phrases
  • Passive Voice
  • Simple and Run-on Sentences
  • Subject-Verb, Prepositional Phrase, and Subordinate Clause Openings
  • Weak Verbs and Verb Tenses
  • Cliches & Jargon
  • Misplaced and Dangling Modifiers
  • and much more

SAS Writing Reviser Add-on for Google Docs

For more information on SAS Writing Resources visit https://goo.gl/zQ1yCD

headshot of Michelle McLeoed
Assessment

Faculty Guest Post: Using Technology to Optimize Student Feedback

This month’s faculty blogger is Michelle McLeod, PhD, ATC, PES, who is an Assistant Professor in the Department of Health & Human Performance.


This blog post is inspired from the lessons and skills learned during the Faculty Technology Institute in May of 2015 focused on planning an interactive lecture. I feel that my lectures are most effective if the classroom is engaged and interactive rather than me talking at students and merely hoping that they are paying attention. It is an opportunity for a real-time assessment and feedback to ensure that students are not only receiving information, but have a fundamental understanding of that information. This also provides me with feedback about my effectiveness in content delivery. I spent much of the 2015-2016 academic year incorporating interactive lecture and technology into my strategy of making the classroom truly more engaged. Here are some of the successes and failures that I encountered.

I will center this blog post on a research proposal assignment given in EXSC 433: Research Methods and Design in Health and Exercise Science. An area where I know that I can continue to improve is providing timely feedback to students. Rather than focusing on the research proposal itself, I will focus on the evolution of the project from the standpoint of how I could more efficiently assess student work and provide helpful feedback through the use of technology.

For me, one of the most painstaking processes of evaluating student work is accessing the work. I really, really dislike accessing work submitted via OAKS. It is so limited. I am also striving to go paperless with most work. In the Fall of 2015, I thought I had found the perfect solution: Kaizena. The tag-line on this Google app is “Fast, personal feedback on student work.” Dream come true, right? Not so fast. I attended a TLT workshop hosted by Jessica. Kaizena seemed awesome. Kaizena is a Google application so all students have access with their g.cofc.edu accounts. Students search for their professors on Kaizena and join “groups” (e.g. EXSC 433). The attraction to Kaizena is that this is a module to keep a running tab of conversations between students and professors regarding their work. Students upload their work in a document that allows you to view the work directly in Kaizena. Professors can create quick links for commonly used feedback in the form of text, hyperlinks, videos, and voice. I thought for sure that this would cut down on the time that it would take for me to provide student feedback and provide them with ample time to make corrections.

I couldn’t have been more wrong. In hindsight, it was probably not the best to try to incorporate this technology without playing around with it more first. I had 24 students in this course so I gave the students the option to work together on these research proposals. The drawbacks I encountered were that I could not create groups within Kaizena. Students had to search for each other first and add me to a conversation. Not such a big deal. However, when it came time for students to submit the first portion of the research proposal consisting of hyperlinks to articles and written summaries of the articles, I felt an impending sense of doom. You are not able to directly edit within the uploaded documents. You may highlight a portion of the document and provide commentary. If the student had submitted their work as a Google doc and provided permission to edit the document, then you could open the document in Google docs to do this. This seemed to negate the need for Kaizena (spoiler alert: this was ultimately my conclusion). Furthermore the biggest headache, perhaps, was that you couldn’t click on hyperlinks in the uploaded documents. As I mentioned previously, part of this portion of the assignment was for the student to provide hyperlinks so that I can confirm their provided references. I was asking students to resubmit their work and on many occasions students claimed to have submitted work that I could not find when I opened conversations.

The end result was that it took me longer than I had anticipated to provide valuable feedback. More of my time was spent requesting changes in the formatting so that I could even access the needed content. I therefore felt the need to be much more lenient in my assessments of student work. However, professors still have learning experiences on the regular, right? This spring semester, I kept this assignment as a part of the course.  Instead of Kaizena, I kept it simple and required students to submit their work via Google drive as a Google document. I still use OAKS to upload lecture content and grades for student accessibility. However, I almost exclusively provide links to a Google drive folder for students to submit their work. I can provide real-time feedback and review changes that have been made to student work as well as see when those changes were made. Because the students can also see when I have provided feedback, this helps to keep both parties accountable.

It’s still not a perfect system. I am still revising rubric content, and finding challenges with students being able to access folders (Tip: if a student says they do not have access, I find that it is because they are trying to sign in on an account other than their g.cofc.edu accounts. Instruct them to first try to sign out and sign back in!) Other lessons learned throughout this process of trying to use something new and fun:

1) Have a rubric! Developing a good rubric can be challenging and does take some time on the front end, but it has made my life easier as far as grading. Students also have a clearer picture of what is expected of them.

2) I love this assignment because it is an opportunity for students in our department to express their interests and creativity. That being said make sure that there are reasonable expectations for what you want to see in their work. I went from having very loose directions for student work to being pretty specific, down to the size of font used, margins, and maximum number of pages in length of proposal sections. In Google, I provided an example that the students could make a copy of and input their own work. You might be thinking: getting a little nit-picky here, Dr. M? Maybe; but, part of research proposal writing is being able to follow directions! Simple, yet still overlooked. 

3) Being able to provide feedback more efficiently and effectively has helped to improve student engagement and interaction. Not always in a direct and personal manner, but it improved communication. I felt that students were more inclined to ask questions or for clarification and I could provide better suggestions or solutions. This was reflected in my course evaluations this spring. Although I’m not yet lightning fast in my feedback my timeliness has drastically improved and I’m optimistic that it will continue.


Google Sheets my fav. 5 tips and tricks
Google, Google Apps, Productivity, Research, TLT

Give Sheets A Chance

I am a huge fan of Microsoft Excel.  It’s my second favorite application, after Photoshop.  However, I’ve been attempting to move all of my work to Google Apps for Education and I felt like Google Sheets was just not as robust a program as Excel.  That being said, I’ve been working with Sheets exclusively for several months now and am finding many things that are making me love it.  Not as much as Excel, but close.

Here are my top 5 coolest things I’ve learned over the past months:

EXPLORE

screenshot of the explore area openNext time you open up a spreadsheet in Google Sheets, notice the little icon in the lower right cornerExplore icon.  If you click it you get a flyout panel called Explore.  This panel gives you a fantastic overview of your data in chart form and allows you to easily add the charts to your document with one simple click.  I loved this and I don’t believe there is an equivalent in Excel.

How can you use this?

If you create a form, in Google Forms, your data will be collected in a Google Sheet.  The charts in Explore give you the overview you need to get started on your data analysis

You can upload any Excel spreadsheet into Google Sheets and it will convert it to Sheets format so you can get this overview on data NOT collected in Google Drive.

PIVOT TABLES

A pivot table is a tool that allows you to summarize and explore data interactively and is particularly useful for large data sets.   I use them primarily to count or average things but they can be used to extract all types of date from sets.   Google Sheets now allows you to easily create these pivot tables.  Here’s an example of a quick table created from the data we looked at above.  This is a simple pivot table but they can be more complicated depending upon your needs.  Just like in Excel, they update in real time, as the data in the Sheet changes.  You can find pivot tables under Data > Pivot Table

screenshot of the pivot tableScreenshot of a more complicated pivot table

ADD AND DELETE CELLS INSTEAD OF ONLY ROWS OR COLUMNS

There are many times that I want to delete or add a few cells in a spreadsheet and have the rest of the spreadsheet shift to accommodate those cells.  In Sheets you can only add or delete and entire row or column which isn’t very helpful.  With the help of an Add-On called Insert and Delete Cells by Karl.kranich.org you now can.  In Sheets go to Add-ons in the menu bar then choose Get add-ons  In the search area, type in Insert and Delete Cells.  Click on Free.  A pop up window will appear so make sure pop-ups are not blocked.  From that window click Allow. 

Screenshot of the menu To add or delete cell(s) just click on the appropriate cell(s) and choose Add-on again.  You will see it in the menu a new option to allow you to shift the cell after adding or deleting. 

How can you use this?

I use this feature all the time.  Here’s an example:  I paste or import data into a spreadsheet and for some reason, one line is offset just one cell.  This happens if there is a wayward space in the paste.  Now I can just select that cell and shift the rest of the columns one cell to the left to line all the data back up.

FINDING UNIQUE AND DUPLICATES

As much as I love Excel I still struggle with filtering duplicates from a dataset.  This is also something that I use all the time.  For instance, for our training stats, I like to see all the individuals that attended TLT training in one year.  For this report, I only want each individual counted once.  For this I use an add-on called Remove Duplicates by ablebits.com.  Just like earlier you can get it from the Add-ons > Get add-ons menu and search for Remove Duplicates.  Once it’s installed you just select the data then choose Remove Duplicates from the Add-ons menu and follow the instructions.  It’s just four easy steps to locating all the unique or duplicate entries in your data and I think it’s 10x easier than the filter feature in Excel.

PREVENT PRINTING, COPYING, AND DOWNLOADING

Screenshot of Advanced SharingDid you know that you can share a spreadsheet with people without giving them the ability to print it, copy it, or download it?  Well you can.  Just open your Sheet and click on the Share button in the upper right corner.  Now click on Advance in the bottom right of the new window.  Make sure your normal settings are set correctly depending upon the level of security you want.  Then at the bottom click on Disable options to download, print, and copy for commenters and viewers.  This actually works surprisingly well, especially with a large spreadsheet.  Could some take a screenshot of the data?  Sure, but the only way to stop that is to not let them see it in the first place.  

How can you use this?

This came to my attention when a faculty member wanted to share a large list of internship options but didn’t want that list to be shared with those outside her class.  Again, while not foolproof, it provides enough of a deterrent to meet the needs.

REMEMBER:  DO NOT STORE ANY STUDENT SENSITIVE INFORMATION ON GOOGLE DRIVE/SHEETS.

I hope these tips will get you to reconsider Google Sheets as a viable alternative to Excel.

GOOGLE VOICE ICON
Accessibility, Checkout Equipment, Google Apps, Productivity

Let Google Do The Typing For You With Voice Typing

I’m not sure how long this tool has been around but I just learned about it today and I’m in love already. Google Voice Typing allows you to open a Google Doc and speak into a microphone and let Google do the typing for you. As a matter of fact I’m writing this blog post in a Google Doc first using the voice typing command.

All you need to do is open a Google Doc, go into Tools and choose Voice Typing. This will then bring up an icon of a microphone on the side of the doc. Whenever you’re ready to start typing just click on the icon and begin speaking into the microphone. As of now, I believe this tool is only available in the Docs part of Google Drive.

Here is an example of what some of the blog post looked like before I did some corrections.Google Voice Example   This was taken at the beginning of writing the post, and as you can see I did make some changes.  But overall, it worked beautifully.

Uses:

  • For anyone with a learning disability, such as dyslexia, it allows them to type without having to make as many spelling mistakes that can often accompany this type of disability.
  • For those with carpal tunnel, it can also help alleviate some of the symptoms as you will be typing less.
  • It works when outlining, planning, and writing papers.
  • Use it when writing email where you could write the email in Google Docs and copy it into your regular email. This is particularly helpful for long emails or emails where you need to go into a detailed explanation.
  • I think it’s fabulous for brainstorming as you can just speak your ideas and not feel the need to type every single thing that you’re thinking.
  • I’ve tested it as a way to create a transcript for a video lecture that you might be creating for your class. In my test I opened up Screencast-o-matic, which is a tool that will capture your desktop, and then opened a Google Doc and triggered the voice tool. Once I began the recording of my screen and microphone I then just went back and clicked on the microphone icon in my Google Doc, in order for it to transcribe everything I said. Using this, I was able to explain the slide as I normally would when lecturing and as I was recording the lecture, Google Doc was typing what I said. (Tutorial will be coming soon.)
  • Lastly, I’m curious to see how well it would do taking notes, in a meeting for instance.

Can you think of any other uses? If so, share in the comments!


GOOGLE VOICE ICON

Things To Consider:

I do recommend that if you want to use this tool you try a microphone that can maintain an equal distance from your mouth, such as the one that maybe came with your cell phone or a headset mic (that can be checked out from TLT). The better the microphone quality, the more accurate the typing. When speaking, it does recognize punctuation as well as the “new line” command. However, it didn’t seem to understand a few other words such as “delete” or “backspace”, so it will require that you go back through your document when you’re finished. and do some formatting. However, it’s a great way to type a lot of text quickly and easily without a lot of headaches.