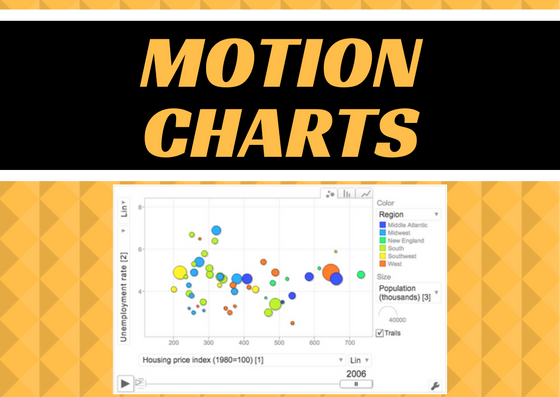
MOTION CHARTS
Google, Google Apps, instructional technology, Research

Using a Motion Chart to Visualize Data

While motion charts are not new, I just learned about them and I thought they would be something that faculty can use in their classes to help students see and understand certain concepts in their classes.

Motion Chart

A motion chart, at least as it’s used in this post, is a bubble chart that can be controlled by the viewer, not the creator.  It allows the viewer to visualize multiple dimensions of the data.   These dimensions are shown by the bubble size, color and position on the chart over time.  Here is an example from Kwantu.com:Screenshot of the bubble chart
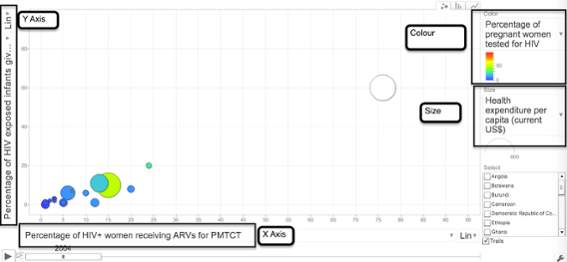
  • Vertical (Y) axis – Percentage of HIV exposed infants given ART for PMTCT at birth
  • Horizontal (X) axis – Percentage of HIV+ women receiving ARVs for PMTCT
  • Bubble size – Health expenditure per capita (current US$)
  • Bubble colour – Pregnant women receiving prenatal care (%)
  • Time – Years

According to JuiceAnalytics, “modern-day motion charts were developed by an organization called GapMinder as part of a product called Trendalyzer.  Hans Rosling, one of the founders of GapMinder, popularized the motion chart visualization in a much-admired TED Talk.”

What are they good for?

What I think sets this chart type apart from other charts in either Excel or Google Sheets, is that they are interactive.  The end-user can use the sliders to change time and the dropdown menus to change the data parameters shown.  It allows the viewer the control over what they see to help them better understand the data and to work with it in multiple ways.  Any discipline that uses statistical or relational data over time can benefit from a motion chart (political science, sociology, history, education, biology, etc.).

How do you make one?

With Google Sheets, part of CofC’s Google Apps for Education (G-Suite), you can make a motion chart in just a few easy steps.

  1. Create the data in Google Sheets, or upload it from an existing Excel spreadsheet into Google Drive.
    1.  Column A (first column) should contain the data you want to track.  In the example above, it is Country.
    2.  Column B should contain the time data and should be sorted/grouped by time.
    3.  Column B also needs to be formatted as a date, not text.
  2. Highlight all the data in the table and click on Insert > Chart.
  3. Choose the Chart Types tab.
  4. Scroll to the bottom under Other and choose Motion Chart.
  5. Click Insert.
  6. Once it’s inserted you will be able to change the X/Y access, use the scroll bar to slide through the times and the boxes on the right to narrow the data seen.

BONUS — You’ll also notice, in the upper right corner, that you can choose between a bubble chart, bar chart, or a line chart.

Let us know

If you try this let us know how you are using it in your teaching or with your students!  We love to hear from faculty.
Explain and Send Screenshots Example
Google, instructional technology, Productivity, Web 2.0

Tech Tip Tuesday – Create and Annotate Screenshots on Any Computer (Free)

In the past, Skitch was my go-to app for creating annotated screenshots. Sadly, Evernote stopped supporting Skitch in 2015. As someone who uses a Mac, PC (Windows), and Chromebook, I’ve been searching for a free (or inexpensive) solution that works on all platforms. And, Explain and Send Screenshots is it!


What is Explain and Send Screenshots?

Explain and Send Screenshots is a free Google Chrome Extension. It works on any computer using the Google Chrome web browser. Unlike most extensions, Explain and Send Screenshots does not “Read and change all your data on the websites you visit”—making it a safer option.


How Does It Work?

Once you’ve added the Explain and Send Screenshots extension to Google Chrome, you can click on the extension’s icon (see image below) to take a screenshot (image) or screencast (video) of any webpage.

Explain and Send Screenshots Menu

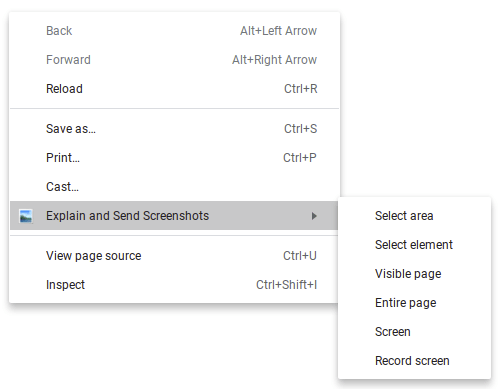
You can also right-click on a webpage to quickly access the context menu.

Explain and Send Screenshots Right-Click Menu

No webpage, no problem. You can annotate on any image (.png or .jpeg) via the Open file… option.


What Are Its Features?

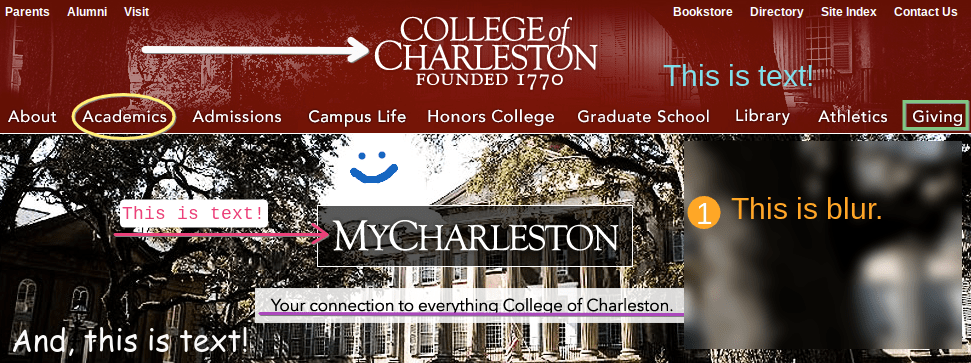
After you take your screenshot, you’ll have several annotation options: circle, square, arrow, line, draw, text, number (and text), highlight, and blur. Blur is especially useful for concealing sensitive information, like students’ names.

ESS Edit Options


Explain and Send Screenshots Example
Annotations Example


When you’re done annotating, you can copy/download/save the screenshot (image) as a .png or .jpeg (image format can be changed under options). Screenshots (image) can also be saved as .pdf using Chrome’s Print… > Save as PDF option. Screencasts (video) are saved as .webm, which can be viewed in any web browser or VLC (media player). They can also be easily uploaded to YouTube.

ESS Share Options

Top Secret
Best Practices, Google, Google Apps, TLT

#OneNewThing: Secret Google Drive Sharing Tips!

Google Drive makes it easy to share any file with someone as either VIEW ONLY or EDIT via the SHARE button in any Docs, Sheets or Slides file. But did you know that there are other methods to share?

Preview Mode:

Preview mode is a cleaner look for sharing on websites or with others.

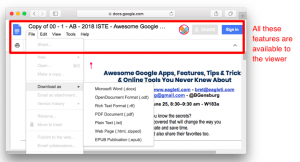
Use this when you want to viewer to only view the document but not make a copy of it into their own Google Drive.  When you share a Google file as View Only it still gives the users an opportunity to download it or to copy it into their own Google Drive.

Regular Sharing Mode:
Regular share showing the Google Docs menu bar at the top

Preview Mode:

When you use PREVIEW mode it’s cleaner and has no copy/download options
Preview mode with no menu bar showing

How to Use Preview Mode

  1. Start in Google Drive inside your file.
  2. Click the Share button in the upper corner.
  3. Click on Get Shareable Link and choose Anyone with the link can view.
  4. Copy the link given.
  5. Open a Word document, Google Doc, or a Text Note and paste the url you copied into that document.
  6. Highlight the end of the url, everything from the word Edit or View on and delete it.
  7. Now, in it’s place, type in the word preview.
  8. Copy this new URL and use it wherever you want (webpage, blog, etc.)

Example: https://docs.google.com/document/d/1Qutrs_d25LuUioopq2VFUV6iJe2GNYxSxrUJeZeXovM/preview

Copy Mode

Copy mode forces the file to be copied into the viewer’s Google Drive account before they can view it.

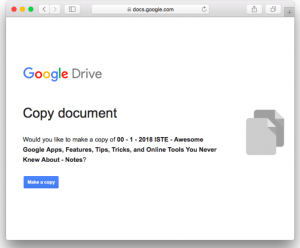
You can use this when you want to give a handout, worksheet, or template to your students for them to complete without altering the original.  When you share a Google file as View Only it can be copied into a user’s Google Drive but the user has to know how to do this.  Using the copy mode the user is prompted to copy the file and doesn’t have to know how to manually do it.

copy document screen with blue "make a copy" button
Above is what the user will see when they click on a link modifies for Copy mode.  Clicking on Make a Copy will automatically copy the file into their Google Drive.

How to Use Copy Mode

  1. Start in Google Drive inside your file.
  2. Click the Share button in the upper corner.
  3. Click on Get Shareable Link and choose Anyone with the link can view.
  4. Copy the link given.
  5. Open a Word document, Google Doc, or a Text Note and paste the url you copied into that document.
  6. Highlight the end of the url, everything from the word Edit or View on and delete it.
  7. Now, in it’s place, type in the word copy.
  8. Copy this new URL and use it wherever you want (webpage, blog, etc.)

Example: https://docs.google.com/document/d/1Qutrs_d25LuUioopq2VFUV6iJe2GNYxSxrUJeZeXovM/copy

Other Options

Other options available using the method outlined above.  Just replace the Edit/View area of the URL with:

export?format=doc – forces the Doc to download as a Word file.
export?format=pdf – forces the Doc to download as a PDF file.
export?format=rtf – forces the Doc to download as a Rich Text Fomat file.
export?format=txt – forces the Doc to download as a Plain Text file.
export?format=html – forces the Doc to download as an HTML (web) file.

Example: https://docs.google.com/document/d/1Qutrs_d25LuUioopq2VFUV6iJe2GNYxSxrUJeZeXovM/export?format=doc


Copy Mode:

Google Chrome Icon
Accessibility, Google

UDL Chrome Extensions that may help Struggling Students or those with Special Needs

One of the sessions at this year’s ISTE Conference was on “Google Tools for Struggling Students.”  From the resources posted I found a list of wonderful Google Chrome browser extensions, by Eric Curts, that could be really useful for ANYONE, not just students with special needs or those that are struggling.  The resource identifies 31 extensions which you should look through but I’m going to highlight a few I think are the best to help you narrow the field a bit.  READ ERIC CURTS’ FULL ARTICLE WITH ALL OF THE EXTENSIONS.

Text to Speech

read&write logo

Text-to-speech read an entire webpage or a highlighted selection.  This is helpful for those with

dyslexia, non-native speakers, and those with focus issues.  I use it to help me read text that is very technical or very boring.  I like to hear the computer read along with me to keep me on task.

Read&Write for Google Chrome

Eric Curts calls this extension the “Swiss Army Knife” because it does so much.  One of the things it can do is read any webpage, either the entire page or a highlighted selection.  It can also define words which we’ll look at more in the Readability section below.  This extension also allows for highlighting web text and many other features.

Speech to Text

microphone

Speech-to-text allows the user to speak into the computer microphone and the computer will translate that speech to text.  These extensions allow you to use Speech-to-text on any webpage. Note: Google Docs has this feature built-in and no extension is needed when there.

VoiceIn Voice Typing

Allows the user to dictate text into any text box or entry point of a webpage or webform.

Readability

Readability refers to how easy it is to read the webpage.  This includes the font, issues with color and contrast, and the reading level at which the page was written.

Open Dyslexic fontOpenDyslexic

Overrides all fonts with the OpenDyslexic font making it easier for users with dyslexia to read the text.

Color Enhancer

For users who are partially color-blind.

Read&Write for Google Chrome

Eric Curtis calls this extension the “Swiss Army Knife” because it does so much.  One of the things it can do is read any webpage, either the entire page or a highlighted selection.  It can also define words which we’ll look at more in the Readability section below.

Reading Comprehension

TLDR logoTLDR: Summarize Anything

Generates a summary of any webpage you are on in either short, medium, or long length.


Focus

BeeLine Reader

Removes ads, comments, and other distracting items from the screen.  Also uses a color gradient to guide the eye.


Navigation

Crafty Cursor logoCraftyCursor

Highlights the cursor to make it easier to see.  Also great for using when screenrecording.


Caret Browsing

Allows the user to navigate through and highlight text on a webpage using only the keyboard.


Chrome Accessibility Features

Zoom

User can adjust the zoom level of the browser by pressing:

  • Ctrl and + to zoom in

  • Ctrl and – to zoom out

  • Ctrl and 0 (zero) to return to the original zoom level

Font face and size

Users can set the default font face and default font size for all websites.

  1. Click the settings button in the top right corner of Chrome.
  2. Choose Settings from the drop down menu.

  3. Scroll down and click Show advanced settings.

  4. Now scroll down to the Web content section and click the Customize fonts button.

  5. A window will now open where you can adjust your default font settings.

Keyboard shortcuts

Many common tasks in Chrome can be accomplished with keyboard. Some common keyboard shortcuts are listed below.

  • Shift+Alt+T = Main Toolbar (contains Back, Forward, Reload, etc)

  • Shift+Alt+B = Bookmarks Toolbar

  • Ctrl+1 through Ctrl+8 = switches to the tab at the specified position number on the tab strip.

  • Ctrl+9 = switches to the last tab.

  • Ctrl+Shift+Tab or Ctrl+PgUp = switches to the previous tab.

  • Ctrl+Tab or Ctrl+PgDown = switches to the next tab.

  • Ctrl+W or Ctrl+F4 = closes the current tab.

A full list of Chrome keyboard shortcuts can be found at https://support.google.com/chrome/answer/157179?hl=en&ref_topic=14676

6 reasons to use google docs
Best Practices, Google, Google Apps, Productivity

6 Reasons To Use Google Docs Instead Of Word

The latest installment in my series on 6 Reasons To Use Google Apps For Education will take a look at Google Docs.  Google Docs is a free, web-based, word processing application that is basically like Microsoft Word.  All files are automatically saved to the cloud so you never lose anything and can access your work from any computer, anywhere, using just a web-browser. In my mind, this alone is reason enough to use it.  As a matter of fact, a month ago my computer died…completely.  However, all of my files were saved to Google Drive so I didn’t lose ANYTHING!   The other benefit to using Docs is that your students already have CofC Google accounts and it’s easy for them to use and access if you want to use it in your classes.  Just like Microsoft Word, Google Docs allows you to write and edit documents, autosave, add images and tables, and create footnotes and bibliographies.  But there are so many more features that set this tool apart from Word (way more than six)!  Google Docs has all of the same collaboration, sharing and revision history that the other Google tools have (see the other posts in this series on Google Sheets and Google Slides to learn more) so I’m not going to include those below.

So without further ado, here are six reasons you should be using Google Docs instead of Word:

Reason 1: Speech To Text

Speech to text iconSpeech to Text allows you to speak into your computer’s microphone and Google Docs will type what you say.  It isn’t perfect but it’s pretty darn good.  I am impressed with its accuracy without any of the voice training normally required by these types of applications.  I recently read an article that discusses how well it does with dialects and accents.  It also apparently works with a plethora of languages.  NOTE: It only works with Google Chrome web browser but that shouldn’t be a deal breaker.  To learn more visit Type with your voice on the Google Docs help pages.

Reason 2: Add-Ons

I love the concept of add-ons for a program because it allows users to add features that aren’t built into the program.  My two favorite add-ons right now are SAS Writer Reviser and EasyBib, but there are others that sound really helpful such as VexTab Music Notation, Math, Rhyme Finder, and Teacher Rubric (disclaimer: I haven’t tried the last four).

Reason 3: Document Outline

If you use the built-in style headers then Google Docs will automatically build a document outline that allows you to jump to any point in a document.  Unlike a table of contents in Word, this outline always stays on the side of the screen, allowing you to easily navigate the document.  Also, unlike the table of contents, the outline is updated automatically each time you add a new header.  No more need to refresh the table.  Access it under Tools > Document Outline.  To learn more visit Edit and use a document outline in the Google help files.

screenshot of the Explore panelReason 4: Explore

The Explore feature is available in each of the main Google tools but it does something different in each tool.  In Google Docs, clicking on the Explore icon in the lower right corner of the window will bring up suggestions related to your entire document or to just the text you have highlighted.  In Docs, Explore will show you topics included in the selected area, creative commons images that are related to the text, and related research articles pulled from the public web and Google Scholar.

Reason 5: Built-in Drawing Tool

Google Drawing is built-in to Google Doc, allowing you to create charts, diagrams, and drawings without leaving your document.

Reason 6: Publish To Web

In addition to fantastic sharing and collaborating features, Google Docs allows users to save their document as a webpage.  While you may be saying, “Well Word lets you save as a webpage,” you would be correct, however what Word doesn’t do is publish it to the web and give it a URL.  This makes it very easy for students to share their work to an outside eportfolio or a blog or just publish it on the web for others to read.  Giving our students a public audience for their work is an important component of some majors and this is an easy way to accomplish it.

I hope that I have been able to sway you, if not to completely change to Google Docs, at least to give it a try.  It has evolved over the years into a stellar product so if you haven’t tried it in awhile (a year) then give it another chance.  I think it will win you over!


Easier Paper Grading with Google Classroom
Assessment, Collaboration, Google, Google Apps

Easier Paper Grading with Google Classroom

Hurricane Matthew forced TLT to cancel our session on “Easier Paper Grading with Google Classroom.”  We had several people ask if we could reschedule, so to meet the needs of more faculty we decided to do a recorded version of the class.  Check out the playlist to view the entire session, or click on the three lines in the upper right corner to view specific videos in the series.


6 REASONS TO USE GOOGLE SHEETS
Collaboration, Google, Google Apps, instructional technology, Share

6 Reasons You Should Be Using Google Sheets Instead Of Excel

I have always said that if I could only have two applications on my computer it would be Photoshop and Microsoft Excel. With those two applications I can do almost everything I need to do in a day. Lately, however, my eye has drawn to Google Sheets, and I have to say, I love it.

Now some of you may be saying, “Why do I care? I don’t teach accounting.” Well you don’t have to teach accounting to use spreadsheets in your teaching. They are great for collecting text-based information, running statistics and doing calculations, and graphing and analyzing text or data. So now that you are ready to use spreadsheets in your classroom, here are 6 reasons why you should use Google Sheets instead of Excel.

Reason 1: Collaboration

Unlike Excel, Google Sheets is collaborative. All CofC students already have Google accounts so it’s very easy to share a spreadsheet with them or for them to share with one another. When collaboratively editing a sheet each student can see the exact cell that is currently selected all other users, to prevent overwriting. There is also a built-in chat function so students can communicate online while collaborating on a Sheet.

Reason 2: Revision history

Revision History ScreenshotHow many times have you heard, “Student X didn’t contribute anything to the project.” Now you can see exactly who contributed what and when using the Revision History. The built-in revision history gives you a timeline of all changes and additions to the spreadsheet, who made each one and when they made it. Just go to File > Revision History to see this record. The best part? This is all automatically recorded. While you can track revisions in Excel, it’s a more manual process and in the end, still leads to multiple versions and things being overwritten.


Reason 3: Sharing

Google Sheets are easy to share. Because they are already online, Sheets can be shared to OAKS or a website, using a link. These links can be set to allow the users to only view the sheet or to edit it. This is particularly handy if you want to post a spreadsheet in OAKS. Just go to Content and select New > Create a Link and paste in the shared link to your Sheet, making the file easy for the students to locate and easy to work on collaboratively as a class. This is something that can’t be done with Excel (Note: I believe this feature is available in Office 365).

Reason 4: The power of Google

From Alice Keeler, “Because of its tight integration with Google, Sheets can import all kinds of data from other Google services and the web at large. You can translate the contents of a cell using the function GOOGLETRANSLATE(), or you can fetch current or historical securities info from Google Finance with the function GOOGLEFINANCE(). And with Sheets IMPORTFEED and IMPORTDATA functions, you can pull information from the internet directly into your spreadsheet.” (Teacher Tech)

Reason 5: Google Forms

When paired with Google Forms it’s an easy way to collect data. Google Forms, also part of Google Drive (a.k.a. G-suite), allows for quick and easy form creation that professors and students can use to collect data. These forms can be completed by anyone, on campus or off, with or without a Google Account, and the data is dumped right into a Google Sheet. This can be used to replace an audience response system in your class, to check for understanding, to conduct peer evaluation, to collect lab data, etc. Once the data is in the spreadsheet, students can work with the data online or export the Sheet to Excel in order to take advantage of Excel’s more powerful functions and data analysis tools.

Reason 6: Explore with Graphs

explore screenshotSheets has a super cool EXPLORE icon in the lower right corner of every spreadsheet. This offers a quick overview of the data in chart format. You can view the entire sheet or just specific rows or columns. It’s a fast way to get a first look at the trends in your data before moving on to your own analysis. Just click on the icon and Google does the rest. Don’t worry, if this doesn’t provide enough analysis you can always create your own graphs, pivot tables, and calculations.  Excel doesn’t have this feature that I can find.


These are just my top 6 reasons to use Google Sheets. I have a ton more. So, can I do everything I did in Excel in Google Sheets? No, I can’t. Excel’s statistical analysis features and functions are still more powerful and probably always will be, but that’s not really what I use spreadsheets for much anymore. Most of the features I used in Excel, like shifting cells, can be done via a Google Add-on, which is a little extension that you can load to increase Sheet’s functionality. Given that, there’s very little need for me to go back to Excel.

Still not sold?

Check out Alicekeeler.com. Alice Keeler is a Google Sheets guru and she always has some amazing cool tricks that you can do with spreadsheets in the classroom. She has written some Add-ons for Sheets that allows you do have more control and automate some processes. Teacher Education folks, you will love her as all of her examples are from her classroom experience.  Check out this one:

Have everyone contribute to their own tab – Give students their own and collaborate. This add-on takes your class roster and automatically creates a spreadsheet tab customized for each student in your class. It can even copy a template to each tab. What a great timesaver!

Small Teaching Tip Number 5 focuses on using Google Docs and Slides to make in-class group work more productive and efficient.
Collaboration, Google, Google Apps, Productivity, Small Teaching Tip, Teaching Advice

Small Teaching Tip #5: Make Group Work More Efficient with Google Apps

Collaboration and project management are important skills for college students to learn.  Unfortunately, many students grumble about group work and faculty spend too much time managing logistics.  Wouldn’t it be nice if there were tools that could make in-class group work more efficient and productive?

I have a possible solution for you!  Google Apps!

All CofC students and faculty have free access to Google Apps for Education using their College email address and password.

Here are two ways you can use Google Docs and Slides to make group work more efficient:

Share Templates

In-class group work is most effective if students are given clear instructions, including the goals of the activity and expectations for a deliverable.  Without purpose or guidelines, students will be less productive and more easily distracted.

One way to provide structure is to create an outline, template, or worksheet to guide students’ work.  If you create this handout in Google Docs, you can easily share it with students who can then type on the document as they work with their teams.

But, Jessica, wouldn’t that mean all students would be typing on the same document?

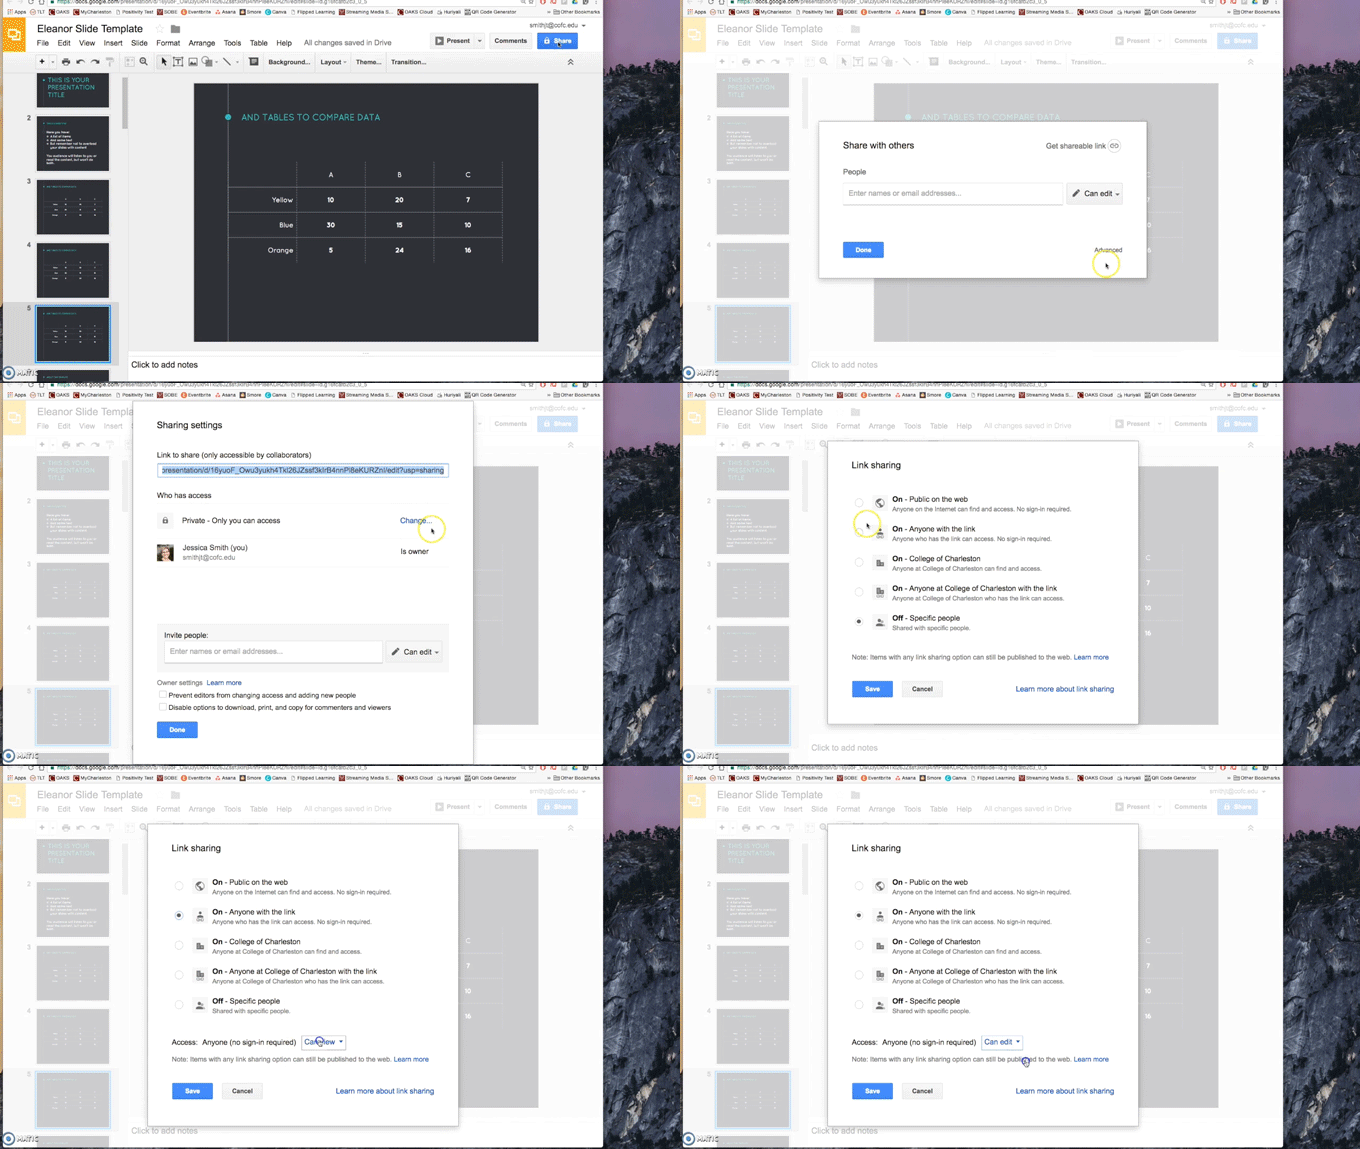
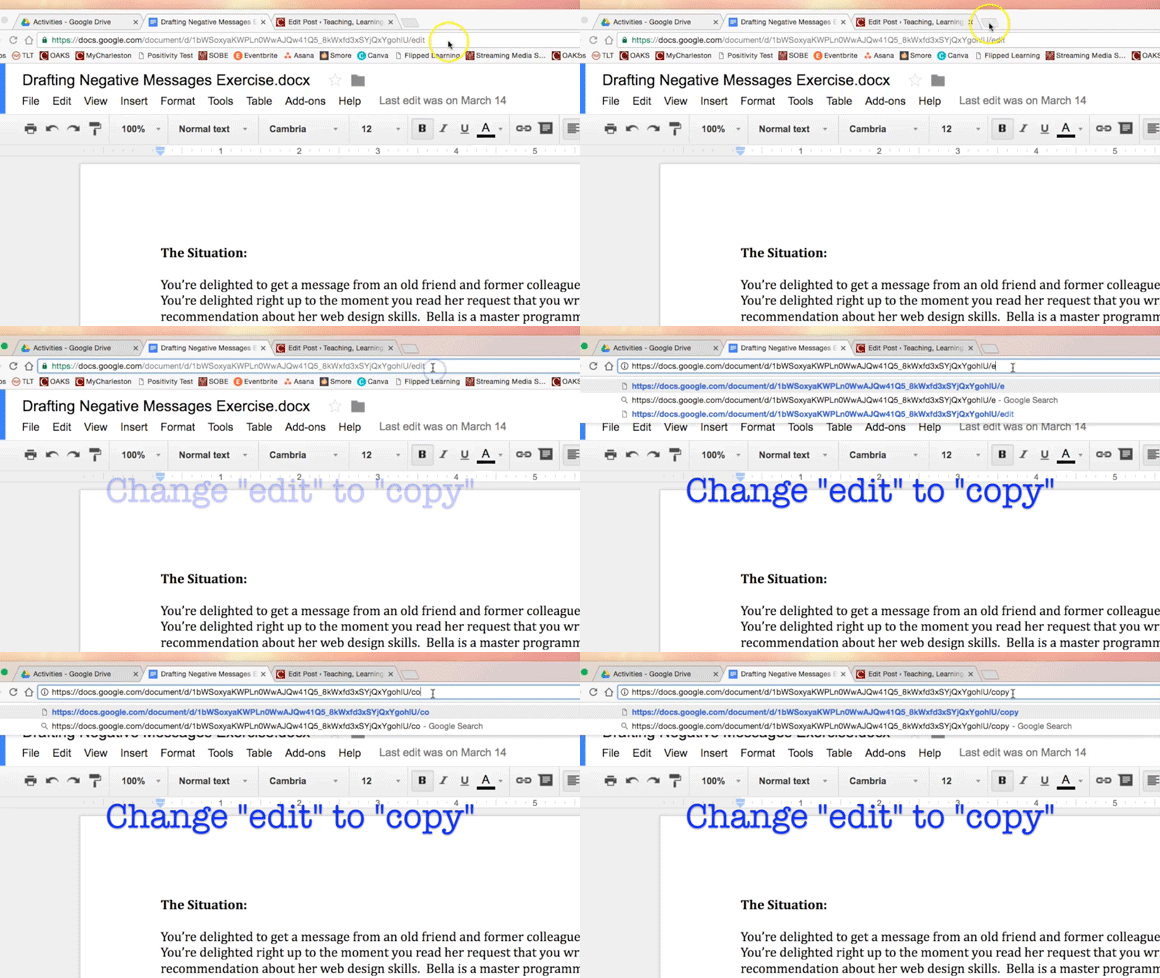
Yes, unless you make this tiny but powerful change to the document URL: delete the word “edit” from the end of the URL and replace it with the word “copy.”

Sharing clean copies of Google Docs with students

When students click on the URL you’ve shared with them, they will be asked to make a clean copy.  Now, each student or each group can work on their own document.

Ask your students to share their document with you so you can see what they’ve accomplished during class.  And if groups run out of time and need to finish outside of class, every group member can contribute from their own dorm room or apartment (because Google Drive is cloud-based).

Share a Slide Master

After students complete an in-class activity or assignment, do you ask groups to present their work to the rest of the class?  This form of debriefing or “reporting out” encourages students to work harder because they’ll have to stand in front of the room to present to their peers.  It also gives students much-needed opportunities to practice their public speaking skills, which are typically quite weak.

But if you ask students to create slides in Powerpoint, every student would have to email their file or save it to a thumb drive and then open it on the teacher station computer.  This requires too much precious class time.

Instead of using Powerpoint, create an empty slide show in Google Slides.  If you want students to design their own slides, simply create a presentation with blank slides (one slide per student or one slide per group, for example).  If you want students to include certain pieces of information on their slides, create a template.  You can then duplicate that template slide for as many students or groups that you have.

Next, give your students editing rights and share the URL with them (watch the animated GIF below).  Every student can now access that slide deck during class and work on their individual slides.   When it’s time to present to the class, you only have to open the one Google Slides presentation and the entire class’ work is right there!

Changing share settings for a Google Doc


We hope you found this week’s Small Teaching Tip helpful.  This post is part of a series which presents low risk, high reward teaching ideas, inspired by James Lang’s book Small Teaching: Everyday Lessons from the Science of Learning.

6 reasons you should be using Google Slides
Best Practices, Collaboration, Google, Google Apps, Presentation, Productivity, TLT

6 Reasons You Should Be Using Google Slides Instead Of PowerPoint

We all use PowerPoint to create and deliver lectures and for student presentations.  But PPT lacks one major feature…collaboration.   Google Slides, part of our Google Apps for Education, is a PowerPoint-like presentation application that has that collaboration piece, making it more useful in an academic environment.

Here are six reasons you should be using Google Slides instead of PowerPoint.

  1. Consistency — Your presentations look and act the same way on all computers.  Have you ever created a presentation or lecture on your office computer only to have it look or behave differently on the teacher station in the classroom?  With Google Slides, all fonts, images, videos, animations etc. are stored online (in the cloud) so your lectures/presentations will look the same on every computer.
  2. Easy Access — Since both the application and the presentations are saved in Google Drive, it’s easy to access and work on them from any computer or mobile device.   Just log into drive.google.com and you have access to all your presentations, documents and spreadsheets.
  3. Backchannel for Questions — Google Slides has a new Audience Q&A feature which allows your students/audience to ask questions during the presentation.  When activated a web address is automatically added to to the top of each slide allowing the students to ask their questions or make comments.
    screenshot 
  4. Tracking Work in Group Presentations — faculty love group presentations but hate not knowing who did what.  Google Slides has a Revision History section (File > See Revision History) that shows all changes made to the presentation along with who made them.  This is a great way to hold students accountable for a collaborative project.  Because it’s web-based, all students in the group can actively create and edit content within the same presentation at the same time.
  5. Easy Sharing — With one easy trick you can share your lecture presentations so that the students can copy it into their Google Drive and then take notes directly in the presentation Notes area.
    • Open your presentation and click the blue SHARE button
    • Click GET SHAREABLE LINK and click COPY LINK
    • Now paste that link either in OAKS or an email to our students BUT before sending it make one minor change.  At the end of the link change the word edit to copy ex. edit?usp=sharing  /copy?usp=sharing
  6. Efficient In-class Group Work — Create one blank Google Slides presentation and share it with your class.  During the group work each group with create their own slide(s) with their contributions.  At the end of class you have only one file you have to look at and all the groups have access to each other’s contributions.  This also makes it easy to bring the presentation up in class to discuss the group findings.
    screenshot
SAS WRITING REVISER
Google, instructional technology, TLT

#OneNewThing – SAS Writing Reviser

SAS Writing Reviser is a Google Docs add-on that helps to create better writers.  Writing Reviser collects and highlights a multitude of potential flaws in a paper or writing sample and displays it in categories for the writer to review and change if desired.

The goal of the Writing Revisor is to make the writer think about the possible flaws and decide how best to fix them.

–  How It Works

Uses for Faculty & Students

  • Search for and install the SAS Writing Reviser’s add-on in your Google Docs.
  • Open a paper and run the Reviser.
  • Select the category you want to see and watch as all of the items that match that category are highlighted
.
  • Require students to run the report once they have completed their paper or writing project then require them to fix the problems they wish to fix and rerun the report to show their improvement.  The student must turn in the assignment and the report.
  • Students can use it check their writing for common mistakes.  Much more robust than any Microsoft Word features.

Tip:
Start by running the report and working on your top one or two areas of concern.  Working with the entire report is overwhelming.

What it looks for:SAS Writing Navigator - planner, drafter, reviser, publisher

  • Wordiness
  • Prepositional Phrases
  • Passive Voice
  • Simple and Run-on Sentences
  • Subject-Verb, Prepositional Phrase, and Subordinate Clause Openings
  • Weak Verbs and Verb Tenses
  • Cliches & Jargon
  • Misplaced and Dangling Modifiers
  • and much more

SAS Writing Reviser Add-on for Google Docs

For more information on SAS Writing Resources visit https://goo.gl/zQ1yCD