Need help filming yourself? No budget for a tripod? Kentucky artist and film teacher Kathleen Lolley and TLT’s Alea McKinley co-created a tutorial to teach you how to make a tripod for your cell phone using a paper towel roll. Safe, social-distancing was practiced during the collaboration.
Tag: student
Guide to Successful Student-Led Discussion Boards
6 Reasons You Should Be Using Google Slides Instead Of PowerPoint
We all use PowerPoint to create and deliver lectures and for student presentations. But PPT lacks one major feature…collaboration. Google Slides, part of our Google Apps for Education, is a PowerPoint-like presentation application that has that collaboration piece, making it more useful in an academic environment.
Here are six reasons you should be using Google Slides instead of PowerPoint.
- Consistency — Your presentations look and act the same way on all computers. Have you ever created a presentation or lecture on your office computer only to have it look or behave differently on the teacher station in the classroom? With Google Slides, all fonts, images, videos, animations etc. are stored online (in the cloud) so your lectures/presentations will look the same on every computer.
- Easy Access — Since both the application and the presentations are saved in Google Drive, it’s easy to access and work on them from any computer or mobile device. Just log into drive.google.com and you have access to all your presentations, documents and spreadsheets.
- Backchannel for Questions — Google Slides has a new Audience Q&A feature which allows your students/audience to ask questions during the presentation. When activated a web address is automatically added to to the top of each slide allowing the students to ask their questions or make comments.
- Tracking Work in Group Presentations — faculty love group presentations but hate not knowing who did what. Google Slides has a Revision History section (File > See Revision History) that shows all changes made to the presentation along with who made them. This is a great way to hold students accountable for a collaborative project. Because it’s web-based, all students in the group can actively create and edit content within the same presentation at the same time.
- Easy Sharing — With one easy trick you can share your lecture presentations so that the students can copy it into their Google Drive and then take notes directly in the presentation Notes area.
- Open your presentation and click the blue SHARE button
- Click GET SHAREABLE LINK and click COPY LINK
- Now paste that link either in OAKS or an email to our students BUT before sending it make one minor change. At the end of the link change the word edit to copy ex. edit?usp=sharing /copy?usp=sharing
- Efficient In-class Group Work — Create one blank Google Slides presentation and share it with your class. During the group work each group with create their own slide(s) with their contributions. At the end of class you have only one file you have to look at and all the groups have access to each other’s contributions. This also makes it easy to bring the presentation up in class to discuss the group findings.
#OneNewThing – SAS Writing Reviser
SAS Writing Reviser is a Google Docs add-on that helps to create better writers. Writing Reviser collects and highlights a multitude of potential flaws in a paper or writing sample and displays it in categories for the writer to review and change if desired.
The goal of the Writing Revisor is to make the writer think about the possible flaws and decide how best to fix them.
For more information on SAS Writing Resources visit https://goo.gl/zQ1yCD
The Essential Role of Memory Retrieval in Student Learning
Too often, at professional development workshops or on education blogs, there’s an emphasis on designing courses that encourage students to reach the summit of Bloom’s pyramid. There’s absolutely nothing inadvisable about helping students analyze, evaluate, and explore. But in our race to the top, we often overlook the importance of remembering, understanding, and even applying (especially in our upper-level courses). According to cognitive psychologists, this is a mistake that can have damaging effects on student learning. Without foundational knowledge, it is difficult, if not impossible, for students to demonstrate higher order levels of thinking. According to cognitive psychologist Daniel Willingham:
“Thinking well requires knowing facts, and that’s true not simply because you need something to think about. The very processes that teachers care most about–critical thinking processes such as reasoning and problem-solving–are intimately intertwined with factual knowledge that is stored in long-term memory (not just found in the environment).” (quoted in Lang, 2016, p. 16)
Without a solid understanding of basic concepts, theories, and processes, a student cannot think creatively or critically about a discipline’s body of knowledge. This academic groundwork allows students to integrate new knowledge in deeper ways and make more sophisticated connections.
Unfortunately, students often make poor choices when they attempt to learn new information. Have you ever asked your students (maybe after the class did terribly on an exam) how they studied? Often, students will say things like “I re-read my notes” or “I made flash cards and read them over and over again.” Research has demonstrated that these are some of the least effective strategies for committing information to long-term memory. Thus, if we care about our students’ learning, then we must design our courses in ways that actually help students learn, not simply cram and forget.
Exams are considered by many to be the gold standard of measuring student learning. However, most instructors are not familiar with the cognitive science literature and, therefore, do not design exams that actually result in student learning. Better understanding the retrieval effect (sometimes called the testing effect) will help us to create more effective assessments.
How many times have you claimed your “brain is full” or “you can only remember so much”? Our long-term memories are actually capable of holding quite a lot of information. Cognitive psychologist Michelle Miller argues “the limiting factor is not storage capacity, but rather the ability to find what you need when you need it. Long-term memory is rather like having a vast amount of closet space–it is easy to store many items, but it is difficult to retrieve the needed item in a timely fashion” (quoted in Lang, 2016, p. 28). She explains that each time we recall a piece of information, we strengthen the neural pathways that move the information from our long-term memories to our working memories. This is key. The more times we retrieve the information, the better.
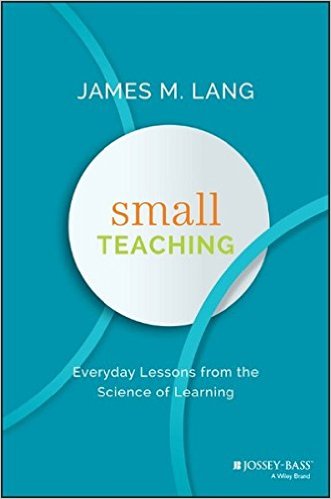
To encourage your students to practice retrieval, try these strategies from James Lang’s book Small Teaching:
The Retrieval Syllabus. Most of us distribute our syllabi on the first day of class and never bring it up again, until a student violates a policy or makes a complaint. Instead of thinking of your syllabus as a contract, envision it as a resource that is continuously referred to throughout the semester. Fill out the course schedule with details that will help students see how the course will progress, how topics connect to one another, and how knowledge is organized in your discipline. Then, during class, ask students to look at the document to orient themselves as well as remind them of what has been discussed thus far.
Warm-up Review. In the first few minutes of class, ask students to write down on a scrap sheet of paper the topics that were covered the class period before or the main themes from the reading. Ask students to share their “take aways”: What do they think was the most important point? What struck them? What piqued their interest?
I’ve done something similar with my students, but I simply asked the class to provide a review orally. Typically, the same few students are the only ones who reply. Thus, not everyone is encouraged to practice retrieval, so this method is less effective than asking all students to write down their recap. This simple exercise has the added benefit of an intellectual “warm-up” — prepping students for learning and participating during class.
Exit Tickets. Similarly, at the end of class, have students to complete an exit ticket. For example, you could ask students to write down two things they learned and one question they still have. This requires retrieval as well as provides valuable information about what students identify as important and what they are struggling with. This can serve as a great jumping off point for the next class period.
What is absolutely essential for both warm-ups and exit tickets is that students are told not to consult their notes or textbook when responding. If students look up the answers, they are not practicing retrieval. It’s also important to explain to students the purpose of these exercises. You’re not trying to test them or give them busy-work; you’re trying to help them learn more effectively.
Frequent Quizzing. Frequent, low-stakes quizzes are one of the best ways for students to strengthen their retrieval muscles. Remember that the more we recall information, the stronger the neural pathways between long-term and working memory. When creating quizzes, it’s essential that they are not weighted heavily. The point is to encourage retrieval, not stress students out. It’s also important to include question types that will be similar to what students can expect on exams. This allows students to familiarize themselves with those formats so the exam is a test of knowledge instead of exam-taking ability.
If you don’t have enough class time to devote to frequent quizzes, consider using online quizzes, such as through your Learning Management System (LMS). Most textbook publishers provide gigantic test banks that provide more than enough questions to create multiple quizzes throughout the semester. These banks are designed to be quickly imported into your LMS and quizzes can be automatically-graded, making quiz creation and administration simple. To ensure students are practicing retrieval, restrict the time limit so they don’t have the leeway to look up every answer in their notes or book (30-60 seconds per multiple choice question is advisable).
Space Out Due Dates. Students should complete multiple smaller assessments throughout the semester (as opposed to only one midterm and one final exam). Intersperse lower stakes assessments (e.g. weekly quizzes, practice problems, minute papers) with higher stakes assessments (e.g. exams, research papers, lab reports). According to James Lang, “the more frequently that your students have to check in and offer some demonstration of their learning, the more often you are giving them retrieval practice” (2016, p. 36).
Providing frequent opportunities for retrieval will not only help your students remember important information, it will also open the door to higher levels of cognition. I’ve shared simple but powerful ways to help your students learn that do not require extra preparation, overwhelming amounts of grading, or even that much class time. Want more ideas? Check out James Lang’s fantastic book Small Teaching and then ask yourself, “what small changes can I make to help my students learn?”
Guest Post: I Flunked Blogging…But Learned A Lot In the Process
Our guest blogger this week is Louise Ackerman from Health and Human Performance.
That might be a slight exaggeration. My experiment with blogging wasn’t a total failure, but it also was not the resounding success I envisioned.
Background
As the faculty coordinator for Public Health Internships one of the challenges I face is finding ways for students to share insights as they navigate their field experience. Internships by nature require students rarely to be in the same place at the same time. Yet on the few occasions when they do get together they benefit greatly from comparing notes and “talking shop.” After learning about blogging at the Summer 2014 Faculty Technology Institute, I though I had found a way to bridge the gap.
Over the subsequent two semesters I implemented a class blog, the purpose of which was to provide students with a virtual “space to share experiences—discuss issues and ideas relevant to young professionals, help one another manage field-related problems, raise work-related concerns, and fill each other in on information and opportunities in the Pubic Health arena.”
Public or Private?
I knew what I was aiming for, but was not clear which platform would be most suitable. With the help of TLT consultant, Laura Plotts, I settled on Google Blogger. Because internships are about preparing students for the real world, I wanted a platform they could easily adapt to life and/or work after graduation.
Google Blogger allows you to create a public blog, accessible to anyone with an internet connection, or a private blog, which is accessible only to invited viewers. I opted for the latter for two reasons: I thought students might speak more freely knowing the blog was for class eyes only, plus I was concerned that some might unthinkingly post comments that could jeopardize their internship should co-workers or a supervisor see them.
Lesson #1: I now recommend not going private. If you’re going to ask students to blog, let them get used to the idea that what they post may be read by anyone, anytime, and blog responsibly. Better to learn that lesson now than when a real job is on the line.
Lesson #2: If you want to have private conversations, you don’t need a blogging platform. The OAKS Discussion tool will likely work just as well.
If I Build It, Will They Come?
Developing the assignment was the next task. Normally when it comes to classwork, I’m all about crossing t’s, dotting i’s, and leaving nothing to interpretation. This assignment, however, seemed to call for a more free-wheeling paradigm. After all, blogging is essentially about finding your voice: having something to say, and saying it in a way that engages others. I wanted authenticity, and I had hoped that providing less-than-my-usual structure would spur honest, interesting, creative, provocative, and/or helpful posts.
It didn’t.
After a couple rounds of vapid posts I revised the assignment, taking topic selection out of the hands of students, and instead provided prompts to which they were required to respond. While the quality of posts improved immensely, I sacrificed the authenticity I was looking for. The blog went from student-focused to teacher-led (exactly what I wanted to avoid).
Lesson #3: A student blog should be student-directed. In a traditional class setting students would have time to develop a blog that reflected their interests and concerns within the confines of the course. The structure of this course made that unfeasible.
Topic Selection
Over the course of two semesters I played around with types of prompts, trying to find the ideal mix. I was never able to come up with a topic that generated a true discussion—a back and forth similar to what takes place in a classroom. At best students posted well-thought out comments; beyond that they rarely challenged each other or dug deeply into issues, despite grade incentives to do so.
Lesson #4: The prompts that led to the best posts were inspirational, thought-provoking, and/or relevant to students at this time in their lives. (TED Talks were a great resource.). Prompts requiring free writing yielded the least interesting posts. (Students simply followed the lead of the person who responded first.). I had medium success with prompts that asked for helpful information (e.g. job search strategies and exploring solutions to common internship problems).
Lesson #5: Given the lack of meaningful back and forth, simple reflection assignments would be a viable alternative.
Grading
To earn the minimum credit students had to respond to my prompts; they could earn additional credit by responding to their classmates’ posts, which was my way of encouraging discussion. They were given guidelines for what constituted acceptable original posts and reply posts.
Lesson #6: Grading blog posts is challenging but doable. It’s wise to set an approximate word length (I used a minimum of 250 words for an original post and 150 for subsequent posts), and details for what constitutes quality comments. For me that was:
- Thoughtful and/or provocative
- On-topic
- Well-articulated
- Add to the discussion (e.g. comments such as, “I agree” or “I had the same experience” do not count as moving the discussion forward)
- Respectful
Bottom Line
I’m not sure if I’ll revise the assignment and try again. While there is plenty of tweaking that could be done, I’m not convinced that blogging is suitable to my objectives for the Internship class. I am, however, thinking of ways I can utilize the technology in a traditional classroom setting.
Quick Audience Feedback with GoSoapBox
If you’ve ever asked your students “are there any questions?” you’ve likely received blank stares and shrugs. Assuming this to mean everyone understands the content, you move on. But what if students aren’t sure how to articulate what they don’t understand? Or what if they’re too shy or embarrassed to admit they are confused? Or maybe you’re simply looking for a way to get greater feedback from and interaction with students during lecture? GoSoapBox could be just what you’re looking for!
GoSoapBox is an audience response system (a “clicker” tool) that works on any device that connects to the Internet. This tool allows you to survey the class for understanding, quiz them on content, and encourage discussion. The beauty of GoSoapBox is the simplicity of the user interface despite offering numerous features. For example, “Social Q&A” allows students to contribute ideas and up-vote the ones they like. This could be great for an exam review: students submit questions and vote for the ones they really want to spend class time discussing.
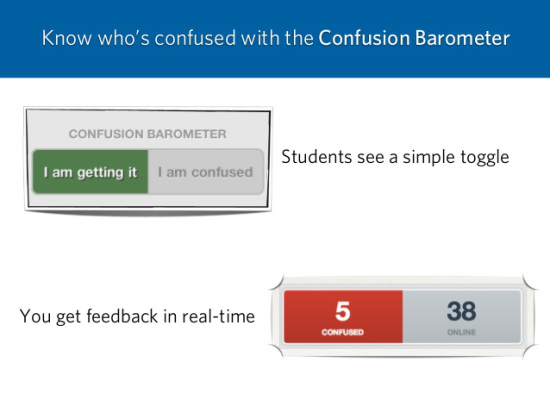
The “Confusion Barometer” is a super simple way to gauge just how well students really understand the material. Instructors can see a live graphical display of how many students are confused by the material being covered and can then adjust their teaching strategy as necessary. GoSoapBox also offers quizzing, polling, and discussion board features, which allow for short answer/open-ended responses.
Students can respond with their names or anonymously, so GoSoapBox can be used to monitor students as well as allow sensitive opinions to be freely shared. Instructors can even export reports in spreadsheet form to track student performance.
So why explore GoSoapBox instead of PollEverywhere? If you have a class of 30 students or fewer, GoSoapBox is free and provides features that Poll Everywhere doesn’t, such as the quick and easy “confusion barometer” and threaded discussions. It’s also a simpler interface so it’s quite user-friendly, while PollEverywhere can sometimes be clunky. However, if you have course enrollment of over 30 students, I would not pay for GoSoapBox; our site license for PollEverywhere provides a great audience response system for free.
Application: http://www.gosoapbox.com/
Platform: Web
Cost: Free for courses of 30 students or fewer
Tutorials: http://help.gosoapbox.com/
GoSoapBox Blog (for updates and tips): http://gosoapbox.com/blog/
Make Professional Looking Voice Stories with Adobe Voice
“Adobe Voice is a free iPad app that helps you create stunning animated videos in minutes.” Just “pick from over 25,000 beautiful iconic images to show your ideas (or choose from photos on your tablet).” Record your voice over the images, one image at a time. “Set the mood with a musical soundtrack and choose the perfect look with just one tap. Watch your story automatically come alive with cinema-quality animation and share it with anyone online.”
— https://standout.adobe.com/voice/
| Student Uses | Faculty Uses | |
|---|---|---|
|
Create a biography/autobiography
Create how-to videos
Recount a story
Create an oral history
Promote an event
Create a public service announcement
Promote an idea
Tell what happened
Teach a lesson
|
Record a lecture
Create a personal introduction
Recount a story
Introduce a new subject
Summarize a chapter
|
What I liked was how easy it was to use. I also like that it uses Creative Commons images and free music so copyright is not a problem. The sharing is super easy and the fact that you can share them privately is also very important when working with student projects.
What some may like less is that you can’t add any video. This isn’t a deal breaker for me and I know that it’s kind of outside the intended purpose of this app. The fact that you can’t use it without an Adobe ID is a bit of a drag for K12 (esp. K8) students. Not everyone wants their students to get these types of accounts. There may be a workaround for this but I didn’t investigate it further. The think that bothered me the most was the lack of ability to make basic changes to the project such as placement and font. I know for many this could be seen as a positive because it makes it easier to use and a bit more universal but if you are pretty tech savvy and like to control a lot of items in a project this isn’t the app for you. You can’t control the placement of the image or text boxes nor can you control font or alignment within the boxes. Again, not a deal breaker, just something to be aware of.
All in all I think this is a great, FREE, app to use as both a student or a teacher. Unfortunately, at this time it is only for iOS devices and I’m not sure if there is an Android version on the horizon.
Price: Free
Platform: iOS only
App Location:
https://itunes.apple.com/us/app/adobe-voice-show-your-story/id852555131?mt=8
Using Kaizena for Fast & Interactive Student Feedback
Let’s be honest. Grading can be a drag. We may love teaching and mentoring students, but when faced with a stack of 100 essays, some of us consider a career change. Providing students with frequent and meaningful feedback takes a lot of time and energy, but there are plenty of applications that can help make you a more efficient grader. One such application is Kaizena.
Kaizena is a web-based platform that is synced with Google Drive. Students can either upload Microsoft Office files or PDFs to their Google Drive account (which CofC students have free access to) or they can create their assignments within Google Drive. The instructor will get an alert that a student has submitted and can then leave text or audio feedback as well as insert outside resources called “lessons” and 4-point scale ratings called “skills.”
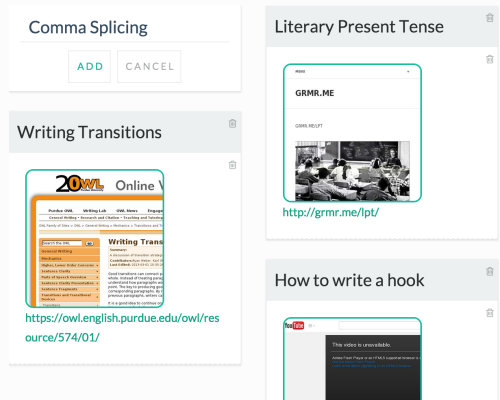
Kaizena’s “lessons” are a fantastic time-saving feature. How often do you find yourself writing or typing the same comment over and over on student assignments? Well, “lessons” allow you to create a library of text, audio, and video resources that can be quickly added to students’ assignments. For example, if I were teaching composition and noticed multiple students making comma splice errors, I could record a quick audio clip explaining what comma splices are. Or, I could find a YouTube video about comma splices and use that existing resource. The next time I come across a comma splice error, I can simply click a button to add that “lesson” and avoid typing yet another explanation of comma splices.
Another aspect of Kaizena that I appreciate is how the feedback is framed as conversations. An instructor leaves an audio comment, for example, and the student can reply with text or audio. When we write comments on students’ assignments, we hope they read them and we assume they understand them. But often this isn’t the case. Kaizena encourages a dialogue between students and instructors that can improve understanding.
Application: https://kaizena.com
Cost: Free
Platform: Web
Tutorials: https://kaizena.uservoice.com/knowledgebase/articles/all
Easy Brainstorming and Voting with Tricider
There have been many times during my teaching career that I’ve wanted to gather my students’ input to make decisions. Would they be amenable to a due date change on their upcoming paper? What resolution would they like to research for their next in-class debate? Would they like to meet in the library or the classroom to work on their group projects?
In some cases, a student may be hesitant to express their opinion in front of others (who wants to be the one person who opposes a due date extension?). Other times, I simply want a quick and easy way to “take the pulse” of my class without counting raised hands or scraps of paper.
Tricider has provided a simple and free solution to all my brainstorming, crowdsourcing, and voting needs.
A user initiates a poll or brainstorming session simply by proposing a question. Then, participants can contribute their own ideas, up-vote other’s contributions, provide arguments for their votes, even upload images. Tricider can be used to help make both large and small decisions, such as where to eat lunch!
 Click Here to see Tricider in action!
Uses:
- Collaborative brainstorming
- Idea ranking
- Making decisions
Benefits:
- Free
- Can be used without registering
- Synchronous or asynchronous collaboration
- Share a poll via email, Facebook, Twitter, LinkedIn, or embedding on a website
- Set deadlines
- Export to Excel
Application: http://tricider.com


