15 Minutes a Day: Get an AIM WIMZI Widget

What does it do?

An AIM WIMZI Widget takes visitors and signs them into the AIM network anonymously, with a randomly generated id like “aimguest369131.” They can then IM with you, via the widget inserted on your blog or webpage.

Chat Client Particulars

If you are using the latest AIM client, visitors will appear in a group in your Buddy List with the same name as your widget.  If you are using Google Chat you can enable AIM.  If you use an alternative client like Adium, you will be able to chat but the group will not show up on your list.

How do I get one?

Customize and create your AIM WIMZI Widget, which gives you the code that you can drop into your web page or blog.  Similar to other chat widgets, AIM WIMZI is customizable:

  • the default standard size is 190×275
  • it comes in both Javascript/HTML and Flash flavors
  • there are 8 styles, as well as a Mini size (160×195)
  • you can change your displayed name (so you can IM with people without revealing your screen name)
  • you can customize the name of the widget
  • you can customize your greeting and offline messages

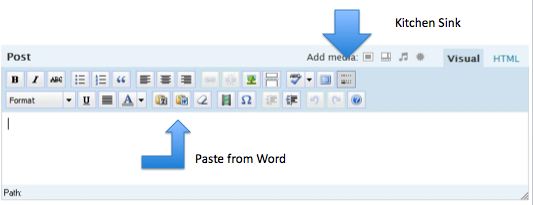
How do I put it in my webpage or Blog?

The html or flash code can be added to your blog, social networking pages or any other website.  Copy and paste your widget code into the html code where you’d like the widget to appear.

Rather put it on your CofC Blog?  BLOGS.COFC.EDU only allows the flash version.  To embed your widget use the White “Embed Flash” button and cut and paste the flash code into the URL field.  The trick is remove the <embed src=” before the URL and the ></embed> after the URL.

Here is an example of what your widget will look like:

[kml_flashembed movie="http://o.aolcdn.com/aim/web-aim/wimzi.swf?appKey=jo1x4P5PIgW3s9kE&theme=snowdust" type="application/x-shockwave-flash" width="190" height="275" >" width="190" height="275" wmode="transparent" /]

Handy Reference: Cleaning up Word Files and Adding Images to Your Blog

Cleaning Up Word Files

  • The character codes used in your word documents are not necessarily the same as those used on the web. If you want to use the contents of a word document use the Paste from Word button rather than cutting and pasting directly

Kitchen Sink Toolbar

  • To the left of the Flash icon (white circle with the letter “F” on it) in the post toolbar is a button that looks like paint sample cards (similar to the type you would get from a hardware store) turned sideways.  This button is called “the kitchen sink”
  • When you hover over the “kitchen sink button” you will see the message “Open Kitchen Sink.” Click the button until you see a second row on your formatting toolbar.
  • Click the button of a clipboard with a Word icon superimposed on it (from the second row).  It is called the “Paste from Word” button.  Click the “Paste from Word” button to paste your content in from your Word document.
  • This method should clean up any gobbly gook or weird formatting you may have.

Uploading Office Documents, Images, Audio Files

  • 10mb storage space

Linking to Shared Media Websites

If you want to Embed the Image

  • select html tab
  • type <img src=”paste your image link here” alt=”image description here”>
  • What it looks like after you do this

Ghastly Beast Drawings

If you want to Embed Audio or Video Files (link to an mp3, mov, Google, YouTube”)

[kml_flashembed movie="http://www.youtube.com/v/TPAO-lZ4_hU" width="425" height="350" wmode="transparent" /]

  • MP3’s (streamed audio files from the web – The College of Charleston’s Language Resource Center is using stream.cofc.edu to host course audio files for enrolled students.

Listen to Introduction to Con Fantasia

Download Title NerdTV MP3 Podcast

Handy Reference: International Accent Marks and Diacriticals

Theory, Charts,& Tips

There are a variety of methods. The International English Keyboard is preferred by those who know the qwerty keyboard, while the specific language keyboards are useful to those who are familiar with them.

Word 2007 has excellent features which one can reach by choosing the Insert Tab and then going to the symbols section of the “ribbon”.

In Word 2003, many non-English characters, as well as icons for food, holidays, activities, signs, math, and much more, are found in the Insert menu, then select Symbol. Within this Symbol Window, the font Lucida Sans Unicode provides many accented and other characters for numerous languages.

Platforms, software applications, operating systems, versions, and user preferences influence how one works with accent and other marks.

The ALT key codes or the Character Map can save the day when nothing else works.

For More information and printable charts visit http://www.starr.net/is/type/kbh.html

Reference for EVERY Character Key on a Mac

Ever wanted to type the copyright icon, or do an accent over an A without having to resort to some character palette?

Liquidicity has put together a series of help sheets that reference all of the characters that aren’t listed on your keyboard, along with their shortcut keys to make your life easier.

For more information visit http://www.gosquared.com/liquidicity/archives/172


New College of Charleston Blogging Server

CofC now has our own blogging server.  Take a moment to look around at: https://blogs.cofc.edu/

The web team is willing to set a redirect from your existing web account if you would prefer to use the blog server for your website. Some advantages to this are that the admin panel is web-based, which means you can access and update your site from any wired/wireless location.  The fact that WordPress allows for static pages provides greater flexibility with your content. Another benefit of WordPress is that it can be used as a kind of content management system.  It separates the layout & design of your page from the content without any need for programs like DreamWeaver, NVU or SeaMonkey, allowing you to create, edit, or update as much content as you want – when you want.

Blogging projects also encourage student collaboration and and participation in the creation, evaluation, discovery, and selection of information.  By participating in a classroom blog, students are able to experience the process of research by posting some of their findings and views on what they are reading and doing. They can also present mini-presentations and comment on classmates works. The blog format can aid in the organization and archival of their work. It can also be used for peer collaboration and feedback from one class member to another, as students learn what their peers are doing as they themselves are doing it. As a result of this interaction, new ideas and opportunities may arise and class projects may morph into new directions.

If you are interested in getting an account please contact the webmaster at  webmaster at cofc.edu and specifying “Blog Request” in the subject line of the e-mail.  By default your blog’s address will be blogs.cofc.edu.

I have a posted a printable handout to get you started.  Happy Blogging!

15 Minutes a Day: What are Wikis?

Wikis are web sites that anyone can edit.  They are by nature a work in progress, and recognize that information is rarely static, and is more often dynamic and multidimensional. A wiki doesn’t just build networks between the editors and authors, it also builds networks between types of information and knowledge.

Wikis of Interest

Where to Build your own Wiki

Here are some different places where you can build your own wiki:

______________________________________________________________

Adapted from Library Instruction Wiki
Content is available under Attribution-NonCommercial-ShareAlike.

15 Minutes a Day: Creative Commons at a Glance

Creative Commons At a Glance
By Judy Salpeter

Creative Commons licensing allows students and educators to determine what rights they are willing to share when they post original images, graphics, audio, text or multimedia works online. It also makes it easier to locate work by others that can legally be incorporated into remixes or other derivative products. Here are some basics for schools that are just getting going with Creative Commons.

Choosing a License

The first step in applying CC licensing to your work is to select the license that suits your preferences. The choices, described in more detail at http://creativecommons.org/, include:

  • Attribution [abbreviation: by] You let others copy, distribute, display, and perform your copyrighted work—and derivative works based upon it—but only if they give credit the way you request.
  • Noncommercial [abbreviation: nc] You let others copy, distribute, display, and perform your work—and derivative works based upon it—but for noncommercial purposes only.
  • No Derivative Works [abbreviation: nd] You let others copy, distribute, display, and perform only verbatim copies of your work, not derivative works based upon it.
  • Share Alike. [abbreviation: sa] You allow others to distribute derivative works only under a license identical to the license that governs your work.

These licenses can be combined in various ways. For example, an Attribution Non-Commercial license lets others remix, tweak, and build upon your work non-commercially but the works they create must acknowledge you and be non-commercial.

In addition, there is a Public Domain Dedication that lets you free works from copyright completely, offering them to the public domain.

Applying the License

Once you have selected your license, the Creative Commons web site shows you how to include the html code with your work. This code will automatically generate the “Some Rights Reserved” button and a statement that your work is licensed under a Creative Commons license, or a “No Rights Reserved” button if you choose to dedicate your work to the public domain. The button will link back to the Commons Deed where the license terms are explained. Your license choice is expressed in three ways:

Commons Deed: A plain-language summary of the license for users of your work, complete with the relevant icons.

Legal Code: The fine print that you need to be sure the license will stand up in court.

Digital Code: A machine-readable translation of the license that helps search engines and other applications identify your work by its terms of use.

Finding CC-Licensed Materials

An increasing number of Web 2.0 tools and search engines (including Google, Yahoo! and Flickr) are making it possible to locate materials online that have Creative Commons licenses. A good jumping-off point for locating such materials is CCSearch.

Where to Learn More About Creative Commons

Compiled and edited by Judy Salpeter with excerpts from the Creative Commons web site, licensed under a Creative Commons Attribution license.

15 Minutes a Day: Google Docs Highlighted in CFD’s Tuesday Tech Tips

Sara Calhoun Davis, Ph. D.
Associate Dean, Education, Health, and Human Performance
Director, Center for Faculty Development <www.cofc.edu/~cfd>

Beth Goodier uses Google Docs and Spreadsheets to enhance her teaching and encouraged me to send out something about the value of this interactive medium. Last week, I attended Mendi Benigni’s (TLT) workshop for us education folks about the same topic, and was amazed at the feedback and collaboration opportunities available with Google Docs. What a boon for teachers!

Wikipedia says, “Documents, spreadsheets, and presentations can be created within the application itself, imported through the web interface, or sent via email.  They can also be saved to the user’s computer in a variety of formats. By default, they are saved to Google’s servers. Open documents are automatically saved to prevent data loss. Documents can be tagged and archived for organizational purposes.Collaboration between users is also a feature of Google Docs. Documents can be shared, opened, and edited by multiple users at the same time.” Important for your classroom is that you can track student work (who did it, who did the most work, when they did it) on group projects and papers; changes are labeled by time and person changing the text. You’ll have fun with this one! Good teaching,

Here are some highlights.

[kml_flashembed movie="http://www.youtube.com/v/eRqUE6IHTEA" width="425" height="350" wmode="transparent" /]

Creating a Collaborative Syllabus Using Moodle

Creating a Collaborative Syllabus Using Moodle

Creating a Collaborative Syllabus Using Moodle

2/27/2008

By Emmett Dulaney
A “collaborative syllabus” is one in which the students have the ability to help determine the specifics of a course. Those specifics can be any element that a professor is willing to be flexible with (such items as the objectives, grading, attendance policies, types of assignments, and so on). The logic behind this tool is that by actively participating in the creation of the syllabus, students are able to signal what they want to learn and how they want to learn it and then (potentially) set the standard by which they will be accountable.

An instrument that has been successfully used before, the collaborative syllabus suffered in one crucial area: It required too much class time to create it. Being unfamiliar with the concept, students first had to have it explained to them in one class period. Following that, there would be several sessions where they would discuss their thoughts, vote on what to incorporate/exclude, and edit the existing document. Given the constraints of the typical 15-week semester, every session is dear, and it is difficult to lose one to such a process, let alone three or four.

In pursuit of a better approach that saved class time, we at Anderson University turned to Moodle for an experiment. The more input students could have in the process outside of class, the more class time could be saved for covering the material. Given that, the creation of the collaborative syllabus was then approached in a three-step process. This article details the steps taken, and the results of walking through this process.

For the complete article visit http://campustechnology.com/articles/58847/

15 Minutes a Day: The IT Guy Archives

techLearning’s IT Guy Archives gives straight forward answers to common questions about information techology.  Want to find out what the difference between the two kinds of high-definition video discs, and is that important? Are you in Wireless Confusion?  Don’t have time to read the article?  Download the podcast!

For great tips visit the IT Guy Archives at:  http://techlearning.com/itguy/archives.php