Our guest blogger is Vijay Vulava, an associate professor in the Department of Geology and Environmental Geosciences. Dr. Vulava was a participant in the Summer 2013 Faculty Technology Institute.
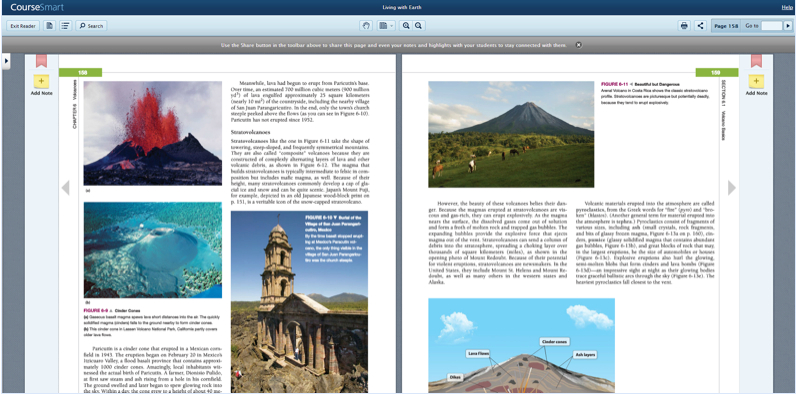
Like any of you at the College, I used to carry a few textbooks on me a lot of times. I had even resorted to keeping a second copy in my home, so I didn’t have to shuttle textbooks with me. One of the great advantages of having a connected device (laptops, tablets, smartphones, etc.) at your disposal is the ability to access digital versions of your textbooks (eTextbooks) anywhere there is internet access. This, of course, depends on whether the textbook publishers make eTextbooks available. A few years ago a publisher’s representative introduced me to CourseSmart (http://www.coursesmart.com/), a consortium of textbook publishers that publish their textbooks online. An exact copy of a textbook I requested was made available in eTextbook format and was accessible on any internet browser within seconds – I just had to login to my account. On this site, all eTextbooks are available for free to any instructor (you have to request access for each textbook), so you get to review a bunch of textbooks before you adopt one for the class. The eTextbooks look identical to hard copies and contain basic note taking, highlighting, sharing, and printing tools. And because the eTextbooks are available on any computer, you could easily take screenshots of selected pages, sections, or pictures to include in your lectures and notes. I found this very convenient in helping my students navigate through textbooks or helping them find information they need. The big downside of this eTextbook platform is that the publishers have not exploited the full potential of eTextbooks. The content in the text is not hyperlinked within the document (e.g., you cannot click on a figure citation to go to the figure), with the publishers’ own teaching resources (often videos, photos, animations, etc. provided in a CD with the textbook), or to any sources online (e.g., videos, government websites, etc.). The publishers could certainly learn a lot about how to make good eTextbooks by looking Al Gore’ 2009 publication, Our Choice and the accompanying app (http://pushpoppress.com/ourchoice/).
iPads have now made accessing eTextbooks more convenient. CourseSmart apps are now available for Android, iOS, or Windows tablets. I now carry these eTextbooks to class, flip to the required section, and show to my students. These eTextbooks are also available offline when there is no internet access available. I often take screenshots of the eTextbook sections right on the iPad (press Power and Home buttons at the same time and find the screenshot in the Camera Roll) and make annotated notes for the class. TLT’s website has tutorials for projecting from an iPad to a digital projector (http://goo.gl/9EXVw).
There are other eTextbook platforms such as Amazon Kindle and Kno that offer alternatives to CourseSmart, but I did not find as large a textbook selection in either of these platforms. Amazon Kindle does offer a large selection of wider interest titles than any other textbook consortium. In addition to the Kindle eReader, the Kindle app is available for all major connected devices as well.
CourseSmart is a good option for students that are digitally adept and those that prefer content from devices rather that physical textbooks. They can rent textbooks for 180 days and the prices are a lot less than what they would pay for a hard copy at a bookstore.
Looking to shake up lectures from the typical Powerpoint and searching for a vehicle that better integrated student response in the presentation, I experimented with Nearpod during the Spring 2016 semester. This app allows an instructor to create a presentation and then push a slide show out to a student’s personal device. Perhaps more importantly, it features built-in activities and quizzes that require the students to interact with the presentation. Student responses from these exercises are available for the teacher to view and subsequently share with the class if they wish. The answers can also be saved and viewed later by the instructor for grading purposes or more in-depth evaluation.
The free version of the application gives you access to the basic features while purchasing the next level opens up more student activity modules. The Nearpod website allows you to create your presentation but the design capabilities are limited. It is easier to create the look you want by creating your slides in Powerpoint, saving them as images, and them placing them in your Nearpod presentation. You can also add activities like open-ended questions, free-draw, and quizzes to your slides. There are numerous Nearpod lessons available for free or a small fee. However, most of these are geared towards secondary school students.
Once you have created and published your presentation, you are ready to use it in class. When you run the presentation, the students will use the code provided to logon to the presentation and will see the individual slides on their own computers or tablets. You can open the application on the classroom computer, but I found it worked better to run the presentation from my iPad and log the classroom computer into the presentation as the students do. This allowed me to project on the big screen what the students were also seeing on their own screens and reference it as we worked.
The first time I used Nearpod with my classes, I requested students bring a laptop, iPad, or other tablet to class with them. While it is possible to view the presentations on a cellphone, the small screen size limits the students’ ability to complete activities. Unfortunately, for a class of 20 students, I only had 4-6 students bring devices with them. This meant that groups of 3-4 students were working together which ultimately led to one or two students being less engaged in the activity. Luckily, TLT allows instructors to check out iPads for classroom use on a short-term basis. Doing this allowed us to have 1-2 students per device which led to greater student participation.
One of the downfalls of the application is that the whole class must stay together. This can be difficult if the students are working on an activity at different rates. In particular, if a student hasn’t submitted a response to a question, once the instructor pushes the next slide, half-finished responses will be lost. To alleviate this problem, I asked students to submit any partial responses when we were ready to move on.
One of the great things about Nearpod is that you can view the students’ responses and choose which ones to show to the entire class. This could allow you to highlight a particularly interesting response or perhaps a response with a common error that you wish to address. When working with grammar, I often prefer to have an incorrect response given instead of a correct one because it creates a teaching moment. However, students often only want to volunteer a response when they are sure it is the correct answer. With Nearpod, every student submits an answer, and I get to decide which ones we should look at together. I’m also able to quickly judge if many students are making the same mistakes.
The free draw activity also lends itself well to the language classroom. I created a lesson in Nearpod on prepositions of location. Using the free draw activity, I gave my students simple commands for drawing a picture. (Draw a girl. Draw a flower next to the girl. Draw a boy behind the flower. Etc.) Everyone was able to draw and then we were able to easily view the students’ drawings as a class and discuss them further in the target language.
Overall, Nearpod worked well to increase active student participation and provided a different way of doing things that helped engage the students. It also forced me to slow down a bit and gave me a better idea of how well the students were keeping up. Additionally, the premium features include being able to assign the presentations as homework which would be interesting to try as part of an online course.
Our guest blogger is Dr. Kate Mullaugh, Assistant Professor in Chemistry.
These instructions are based off iMovie version 10.1.2 on a MacBook Pro Laptop.
Do you teach a course or lab that requires students to carry out a task using a specific hands-on technique? You may have experienced of a large group of students huddled around you as you demonstrate some critical technique only to look up and discover half the class is straining to get a peak at what you’re doing. And a couple weeks later when called upon to use the same technique? Many students could probably use a refresher. If you’ve experienced this in your teaching you may want to consider producing instructional videos using iMovie. Here are some of the benefits:
Everyone gets a front row seat!
Students can get a quick review if they haven’t performed the task in some time.
Videos can easily be replayed if students don’t quite catch everything that is presented the first time around.
If different instructors teach multiple sections of a course or lab, you can ensure students are a getting consistent message across all sections.
If there are hazards associated with the technique (or being in lab in general), safety can be represented in a way that is consistent with your department’s standards.
You can free up time in the classroom or lab for other instruction.
Once produced, videos can be used again and again for semesters to come!
I know…it sounds great, but you don’t know anything about filming and editing videos and you don’t have time to learn. I was surprised how easy it was to use iMovie after attending an iMovie session at TLT’s Faculty Technology Institute and I highly recommend taking an hour to sit in on a training session. Below are some tips and best practices I’ve discovered in making instructional videos for a lab course I teach, “Fundamentals of Analytical Chemistry.”
Recording Videos
This can be done using an iPad (on loan from TLT if you don’t have one) or other device. Before you get started make sure you have plenty of free space on the device because the video files will be large.
Use some sort of stand (i.e., a stack of books) so your footage isn’t shaky.
Have your device in a horizontal orientation.
Have a cameraperson. I have done some videos where I set up the camera and record myself, but inevitably something is just out of frame and I have to reshoot.
Don’t try worry about sound or narrating what you are doing while you film. As you will see iMovie makes it very easy to edit out sound a record a voice over for videos.
Err on the side of capturing too much footage. You can edit it down later.
Import videos from iPad to computer
When you plug in your device to your computer, the screen to the right will appear.
Select “Import All New Videos.” You probably want to have “Delete items after import” selected, which will help free up storage on the device. You may have to do this periodically if you are trying to capture a lot of footage and your device has limited storage.
Edit your video in iMovie
Open iMovie and go to File New Movie. You will first be prompted to select a theme. I personally like “Simple” because it does not clutter the screen with busy graphics.
Click “Create” and name your project.
Drag and drop all files from the “Photos Library” into your new movie on the left panel of the screen (under “Project Media”). If you have still images you want to use, you can do this as well. You can even drag and drop files from a folder in Finder.
You are now ready to start building your movie. To do so, select the title under “Project Media” and drag video clips or images to the panel at the bottom in the order you think you want them to appear. Of course this can be changed later. You may need to take care to ensure the whole clip (or portion you want) is highlighted in yellow before dropping it into the bottom panel.
As you add elements and make other changes, pay close attention to where the cursor (the vertical line in the bottom panel) is. Also note that the aspect you are editing at any given time will be highlighted with a yellow border.
If you need finer control over where you are editing within a video, you can expand it by using the slide bar in the middle of the right side of the iMovie window.
You will periodically want to watch your videoas you go. To do so, place the cursor where you want to start watching and press play in the viewing panel on the right.
Make a Title Slide
I like to start off my movies with a title slide to give them a professional look. To do this I use a still image and over lay it with text. For my series of lab videos I used the same image so they had a consistent theme.
When displaying still images, the iMovie default is to use a slow pan for the aptly named “Ken Burns” effect. To change how the still image appears, double click on the picture in the bottom panel. There you will see two rectangles representing the beginning and end shot. You can change these to zoom in or out, or pan across. To simply display the picture or a cropped version of the picture, select “Fit” or “Crop to Fill,” respectively.
To add text to your title slide, click on “Title” at the top of the screen.
Double click on the version you like (I use Standard) and you will get a warning to turn off automatic content, which I recommend doing to get more flexibility in how the text appears.
Double click on the parts of the title you want to change.
The amount of time you want to have the title displayed can be controlled by expanding or contracting the purple bar appearing above this segment of the video in iMovie.
Picture-in-picture Effect
You may like to do this to for adding a video within another video, which is the same as what I am going to describe here for putting a still image within a still image that is serving as the title slide.
I used the C of C logo for my department to give it an official look. You can access C of C logos for departments across campus from the marketing department here. You will need a C of C Google Drive account to access logos.
Once you have a picture (or logo) located in a folder, you can drag and drop it into your project in the left panel of iMovie. From the “My Media” panel, drag it down so it lands above to the portion of the video where you want it to appear.
Select the picture so it has a yellow border around it. And then select the icon that looks like one solid box with a dashed box behind it.
From the drop down menu select “Picture in Picture.” This is also where you find a side-by-side option, which you may find helpful for some other purposes.
Just like for the still image, the default is again the Ken Burns effect so you will probably want to select “Fit” instead. You may also have to use the crop icon depending on how much of the image you want to appear.
Cut It Out!
If you took the approach of taking a lot of footage for your video, the bulk of your editing will be cutting stuff out.
Once you determine a place where you want to cut something out, place the cursor there and then go to Modify Split Clip and it will make a cut. Repeat at the end of the section you want to remove. Then select the section of the video you want to remove (outlined in yellow) and hit Delete.
Transitions
You will now have somewhat abrupt transitions from clip to clip. Adding smooth transitions will make the final product look significantly more professional.
Go to “Transitions” at the top of the iMovie window.
With the cursor in the gap between clips, select your transition by double clicking. I mostly have used “Fade to Black” for subtle transitions, but you might prefer something flashier.
Add Text Over Video
You can add text to emphasize certain points by selecting “Titles” along the top of the iMovie window
With the cursor where you want the text to appear, double click on the type of title that you want to use (I like “Soft Edge”) and double click on the purple box to change the text. You can also edit the justification and font color/size once it is inserted.
The default for displaying text is 4 seconds, but you can easily change it by expanding or contracting the purple box. I think about 10 seconds is a good length when it’s a full sentence and the audience is paying close attention to what is happening on screen.
If you want to just display text on a blank background at certain points, you can do so by selecting “Backgrounds” at the top of the screen. Here you can insert a plain background (black is probably best) and then add the text as described above. I like to do this to emphasize a particular point or at the end of the video to make “credits”
Note iMovie will not underline misspelled words so make sure you edit your text!
Removing Sound and Adding Narration
I like to remove all sound from the get go. Knowing that I can add in narration later allows me to focus on getting the best visual footage during filming.
Remove audio by selecting a clip, then go to Modify > Detach Audio. The audio will appear as a green rectangle below the corresponding video clip in the lower panel. Select it and hit Delete.
With the background sound removed, I record a voice over. Usually I watch the video without sound and write a rough outline of what I want to say as I go.
To record narration, make sure the cursor is at the beginning of the video and then I press the microphone icon that is located below and to the left of the video panel (close to the middle of the iMovie window). Then a red circle will appear. Recording will begin after the 3-2-1 count down.
You can edit sound clips the same way as the video above. For example, if I know I was sounding good and then I messed up, I can split the clip just before the mess-up (make sure the audio, not the video is highlighted in yellow) and then delete what I don’t want. I can then pick up the recording where I left off by having the cursor in the appropriate position.
TLT has various microphones you may use, or your computer may have a decent one built into it. I’ve found that the microphone on the headphones that come with an iPhone works great. You should listen to your recording (it’s painful to hear your own voice, I know!) to make sure it sounds good.
Making Videos Available on YouTube
This can take some time depending on the length and resolution of your video.
I like to save the video as an .mp4 file so that I can upload it directly to OAKS or share it with people in ways other than YouTube, but you can also upload it directly to YouTube from iMovie. See the menu in to the right.
Edit the title and description if desired and then click “Next…” to export the file and select the folder where you want it to be saved.
Once the export is complete, go to YouTube and click on “Upload.” You will be asked to sign in using your Google username. Then select the file from the folder where you saved it.
While it uploads, you can edit the title and description to how you want it to appear. I also like to make videos unlisted so if someone searches for videos they won’t come across what I’ve done. Students will be able to access unlisted videos as long as they are provided with a link.
Under advanced settings you can disable comments, which I recommend.
Once the processing in complete, click “Done” and the link will be provided. Make sure you copy the link somewhere so you will be able to access it later.
Making Videos Accessible to Students
A standard approach to this would be to embed the YouTube videos or provide links on your OAKS page.
Perhaps a more useful approach that would allow students to readily access the videos “on the fly” while they are in class or lab would be to provide QR codes that can be scanned with a smart phone to access the videos.
There are numerous free QR code generators out there, but here is one I like, which allows you to make up to five QR codes for free: http://qrcode.kaywa.com/
Once the QR code is generated, you can copy the code then paste it where you want it. QR codes can be scanned from printed pages, on a computer monitor or when projected on a screen.
Best Practices
There seems to be a sweet spot of video length that students will watch. If a video is too short (< 2 minutes), students might view it as unimportant and won’t bother. If a video is too long (9+ minutes…yes, really, that is considered too long!), they may not watch it. So extraeffort put into making lengthy videos is likely time wasted!
There are several ways you can use videos to more actively engage your students:
Ask students to “star” in you videos. Students are often excited and flattered to be asked to be in a video.
Make a video without sound and ask students to write a script to go along with it, maybe even record their voices narrating it. This gets you out of having to listen to your own voice when editing!
Document common mistakes in your videos and ask students to critique what they see.
And of course you could always ask students to make their own videos as a project!
Today’s Faculty Guest Post is from Glen Riecken, Visiting Professor of Marketing. Glen attended TLT’s 2015 Faculty Technology Institute. In this post, he reflects on the process of incorporating VoiceThread into his MKTG 302 (Marketing Concepts) courses.
I am writing this blog post based on my experience incorporating VoiceThread into my MKTG 302 classes over the past two semesters. My use of VoiceThread resulted from a confluence of three events: attendance at TLT’s 2015 Faculty Technology Institute where I was first exposed to VoiceThread, preparation to initially teach a hybrid express course at the North campus in Fall 2015, and a nagging desire to create a flipped classroom experience in my live classes. The hybrid course required more online so I needed a way to deliver content in that medium. Having read more and more about the idea of a flipped classroom, I began to see its advantages, especially in generating greater student class engagement in all my classes. When I was exposed to VoiceThread at the TLT FTI, it struck me as an ideal tool to assist in accomplishing my goals.
Here I will briefly discuss VoiceThread, how I use it and some pros and cons from my perspective.
VoiceThread (VT)
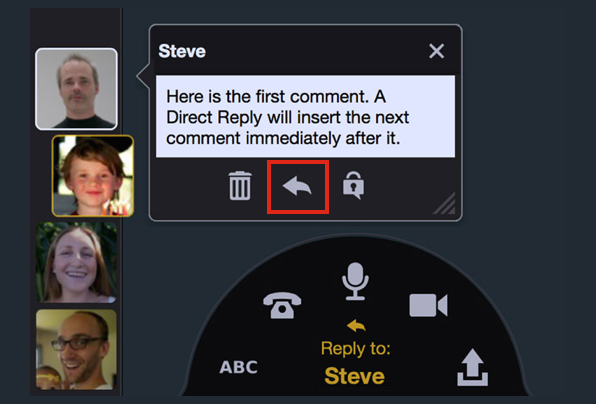
VT is a content delivery and blogging tool, allowing people to communicate through both visual and audio modes in a dynamic and asynchronous fashion. This makes it ideal for creating an interactive environment naturally capturing today’s student immersion in instantaneous interpersonal communication tools. After posting an initial message, others are invited to comment on it. They may answer questions, ask questions or post comments in text, voice, images or video formats.
Access VT through the OAKS homepage.
College of Charleston faculty and students receive free accounts with full accessibility to VT’s many features. It is easy to learn and use. Tutorials are available through TLT, VT and YouTube.
VT is cloud based so works in almost every environment as long as one has access and a device (including mobile) that has Adobe flash. Course homepages have a VT link established and a single click will navigate to VT content for that course. It is fully integrated into OAKS. In the content module in OAKS, I have an outline for each section of the course and, as part of the outline, also provide a direct link to each chapter’s VT. I know it’s redundant, but students will be students.
Creating VT Lectures
I use PowerPoint® (PPT) in my class lectures and had already built a set of slides for each chapter in the text. The first task was to import a slide show into VT. I learned immediately that VT and PPT do not like each other. The secret I learned (thanks to Jessica Smith) was to first save the PPT in pdf format. Once that was done, I assumed the imported file was ready to go. However, another impediment for me was that animations are lost. I use animations to bring in various slide elements sequentially as I discuss them in class; students are more likely to pay attention rather than trying to read an entire slide when I am still talking about the first bullet point. There is, as far as I know, no way around that with VT and this, to me, is a drawback to VT. Similarly, my occasional odd sound effects in some of my slides do not transfer.
VT is more accommodating with Word® but I have noticed that sometimes the formatting is changed a bit. The editing features of VT do not seem to allow an easy fix. After some trial and error, I found that making changes in the Word document itself and then uploading again will often, but not always, produce the format I wanted but this seems like an excessive waste of time. Now, for the few Word documents I use, I don’t worry with the format differences.
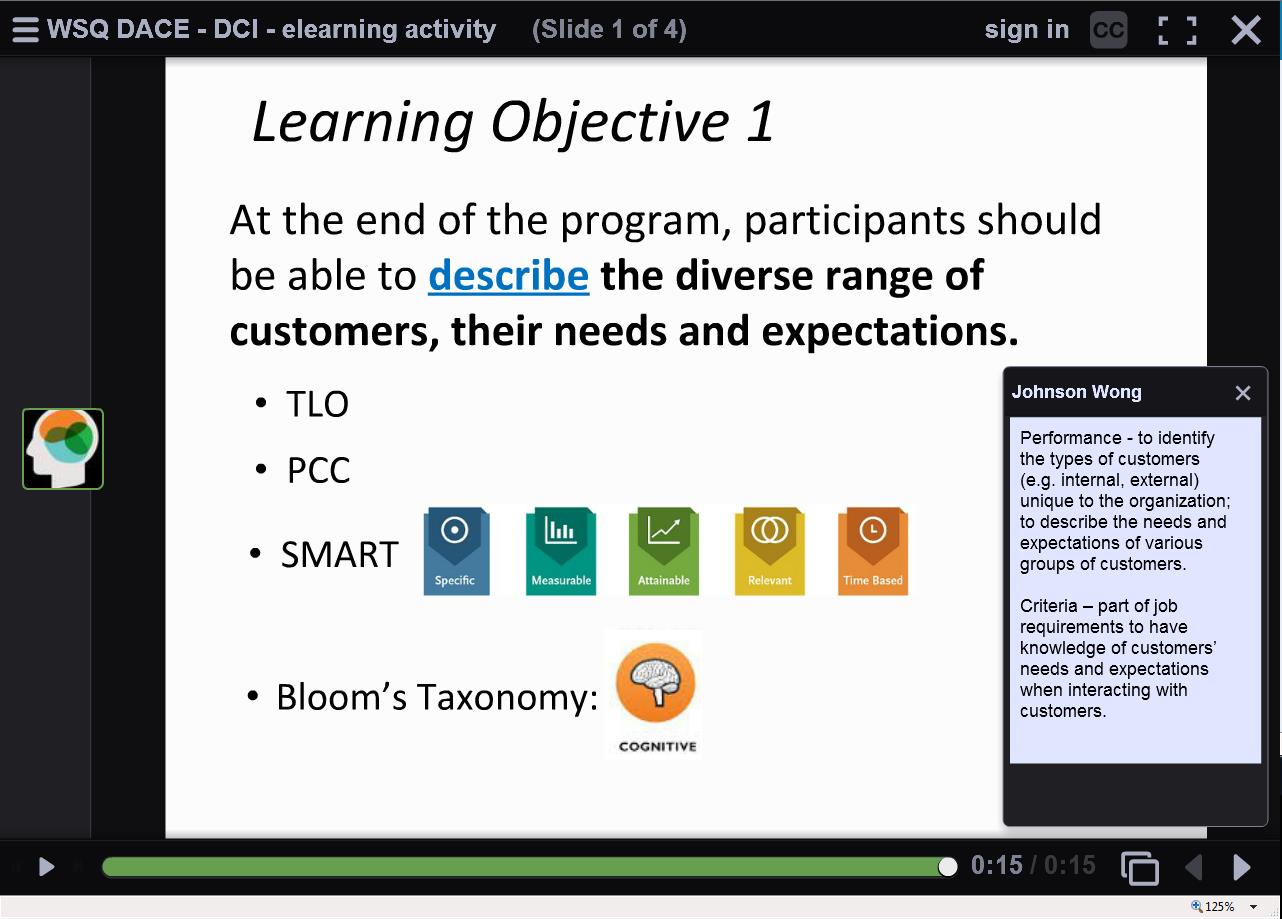
An example VT slide with text comment.
Initially I began recording using the built in camera and microphone on my desktop but soon found the quality of sound was not great and I didn’t like having me show in a little box on the screen, visible to all. An option in VT is to not have the visual box of you show so that part was easily solved. A venture to an electronics store and $30 produced a nifty headset with dropdown mic (mine is a Logitech®) that works great. Incidentally, I chose a corded set since several reviews I read beforehand suggested that cordless sets don’t have the same sound quality. Now I was set to go! By the way, in my last set of instructor evaluations, one student commented that I have a “radio voice” (which I guess is a good thing and goes along with my face which is also ideally suited for radio).
A recording session involves opening slides one at a time and talking about the key points you wish to make. If desired, audio and visual clips may be added (say a YouTube video) as can annotations. For example, in a self-introduction VT, I superimposed a set of dotted lines on a map to illustrate my moves from living in the frozen Canadian prairie to the warm climate of Charleston.
After recording each slide the sound may be reviewed. A drawback, though, is that if a particular piece of sound needs revamping, the whole slide must be re-recorded. Otherwise, the slide may be edited in various ways. Additional slides may be inserted at any time. For example, a good practice is to have a break about every 15 minutes or so. So, after recording a slide show, I can see how long the entire thing is (I shoot for for about 30 minutes) as well as each slide. After adding the length of slides until about 15 minutes and determining a natural break point as close to that as possible, I then insert a “Break in the Action” slide. In these slides I suggest the students relax for a moment to have a bathroom break or have a beverage or take the pooch for a stroll or (not being a cat person) to put the cat outside and lock the door.
VT has a number of options that allow for customization. One pertains to slide advancement. By default, slides are set to advance automatically every 4 seconds but that is easily changed to any desired length or the automatic advance may be turned off which is what I do. Student feedback indicates this is a desired feature, allowing students to go through the slides at their own pace and replay a slide if they wish. They also may stop the presentation at any point and pick it back up later.
Although I have a standard title page in my PPT lectures, another VT option is to add cover art so that each chapter could begin with a picture, for instance, that would match the content. The cover may also be other types of files. So far I have resisted temptation to put links to cat videos as covers for the “Break in the Action” slides. Since I teach marketing I could make a chapter about pricing have a cover slide with various monetary symbols.
Another feature worth noting is that the audience for the VT creation can be made public (open to anyone with a VT account) or restricted to a particular audience. I ensure that my lectures are shared with my classes but are not generally publically available. I don’t need any more hate mail from cat lovers.
Using VT
Students are asked to listen to the VT lectures prior to class discussion. Requiring this makes the acquisition of much of the content up to them, providing more class time for discussions and exercises and moving me towards more of a flipped classroom. Students are not passive listeners to the lectures (other than when they undoubtedly nod off). One feature of VT allows them to “doodle” by making temporary marks on the slides; they might, for instance, circle something to highlight it. These doodles last only a short time so the slides are not inundated with multiple doodles.
Example comment on a VT that others can respond to.
During the lectures I often ask questions, encouraging students to respond. This interactive feature is probably one of the biggest advantages of using VT. Students may respond directly in a number of ways. The responses I have received so far have been text but VT has several other options including microphone, webcam, phone, and audio-file upload. I seem to get a lot more written comments than I do verbal ones in a live class setting. Comments may also be directed at other students’ comments so that an interactive environment is created. Although I have not used this feature, it is possible to require that comments be moderated first so that any inappropriate ones may be filtered out. So far there has been no issue so I continue to labor under the assumption that college students are sufficiently mature to know not to make offensive comments in such a forum.
A second big advantage of VT is that the interactive element allows students to collaborate on projects. In my MKTG 302 classes I do some group activity but so far have not required students to use VT in this regard although I plan to start in the Fall 2016 semester. I have been using the OAKS “Group” feature but now think that VT will be an easier forum for both students and me. For example, one assignment I use now and then is to have groups of 5 -6 students discuss a topic such as whether the attitudes of men and women towards shopping is changing. In VT it will be easier to quickly see comments and participation rather than the more convoluted method in OAKS.
One last feature that I would like to use in VT is integration with the grade part of OAKS. VT is capable of making the integration but I do not know if CofC allows grades to be imported from VT. I use a publisher website for a number of assignments in the class and until very recently CofC would not permit the grade integration feature to work. If it is permissible, I will start using the grade integration feature this fall. [Note from TLT: this is a new feature in VoiceThread that we are currently exploring. If we are able to offer this feature, we will inform the campus community]
Student Feedback
Student feedback from using VT has been very positive. Students like the flexibility of choosing when to listen to the lectures. They also like their availability for study purposes. Some report liking the ability to listen at their own pace and being able to go back and listen to chosen slides again if needed. A few students indicate they like the comment feature where then can post comments rather than verbalizing them in class. And some, inexplicably, enjoy my cat comments.
Today’s Faculty Guest Post is from Chris Mothorpe, Assistant Professor of Economics. Chris attended TLT’s 2015 Faculty Technology Institute. In this post, he reflects on the process of revising and improving a group research project in two of his courses: Urban Economics and Economics of Geography and Transportation. This is an excerpt from Chris’ own blog. To read the entire post, please visit: https://sites.google.com/site/chrismothorpe/home/group-research-projects
I am writing this blog post based on my experience conducting research projects in my upper level economic classes over the past three semesters. This post will not discuss the research project in its entirety; instead, it will provide a general overview of the project and then focus on specific challenges I have faced each semester and different strategies I have employed (or I am planning on employing to overcome them). There are two main challenges I will discuss: 1) group formation; and 2) peer evaluations.
Project Overview
I decided to require a group research project after reading several magazine and newspaper articles discussing what companies are looking for in college graduates. Atop many of the surveys were not the hard-technical skills taught in the classrooms, but many soft-skills developed in the non-academic, extracurricular setting. These soft-skills include: 1) leadership; 2) ability to work in a team; 3) written communication skills; 4) problem solving skills; 5) work ethic; 6) verbal communication skills; 7) initiative; 8) interpersonal skills; 9) creativity; and 10) organizational ability. Conducting a group-based research project provides students the opportunity to practice many of these skills — practice they would otherwise not receive if the class is taught in a more traditional manner. A second motivating factor is to allow the students the opportunity to apply economic models to real world problems.
I decided to require a group research project after reading several magazine and newspaper articles discussing what companies are looking for in college graduates. Atop many of the surveys were not the hard-technical skills taught in the classrooms, but many soft-skills developed in the non-academic, extracurricular setting. These soft-skills include: 1) leadership; 2) ability to work in a team; 3) written communication skills; 4) problem solving skills; 5) work ethic; 6) verbal communication skills; 7) initiative; 8) interpersonal skills; 9) creativity; and 10) organizational ability. Conducting a group-based research project provides students the opportunity to practice many of these skills — practice they would otherwise not receive if the class is taught in a more traditional manner. A second motivating factor is to allow the students the opportunity to apply economic models to real world problems.
The stated objectives for the research project are:
Analyze a contemporary economic issue or social issue using economic theory and models
Demonstrate versatile and competent written, oral and digital communication skills
Evaluate communication situations and audiences to make choices about the most effective ways to deliver messages
Appraise written communication skills through self and peer evaluations
Manage diverse teams successfully
The project is set up as a paper submission to the (fictional) Charleston Journal of Economics, which I reside over as Editor. At the beginning of the semester, I pass out the Fall/Spring 20XX Charleston Journal of Economics (CJE) Request for Papers (RFP), which contains the objectives of the journal, the strategic areas, scoring criteria, formatting requirements, and examples of correctly formatted submissions. Throughout the semester, groups are required to submit portions of their project to the Editor and receive feedback (in the form of a letter from the editor). I have required the research project in the Spring of 2015, the Fall of 2015 and the Spring of 2016. These three iterations have proven valuable as I continually update the project to improve on its effectiveness and efficiency in delivery.
Group Formation
In the first iteration (Spring 2015) of the research project, I allowed each student to write his/her own paper and choose any topic as long as it was related somehow Urban Economics. While allowing each student the opportunity to write their own research paper provides the best learning opportunity for the student (since he/she receives individualized feedback), it is much harder (time consuming) on me. I realized that there were three main consequences to allowing students to complete their own project:
Grading fatigue
Increase time until work is returned to students
Grading research projects detracts from other activities such as research
In the second iteration (Fall 2015), I switched from individual research projects to group based projects. I allowed the groups to form endogenously — students selected their own groups. Each research group was required to have 3-4 individuals. The main problem that arose from students selecting their own groups is that the groups were not interdisciplinary in nature. For example, Group A consisted of three Transportation and Logistics Majors. One of the comments Group A received on one of their drafts was that their paper lacks a sufficient economic model. The feedback I received from Group A was that there is not a economic major (or minor) in the group, and as a result no one is familiar with economic models.
In the second iteration, I also began restricting the topic selection by requiring each group’s research question to at least fall within one of the strategic areas of the Charleston Journal of Economics. The strategic areas are:
Transportation Infrastructure
The Port of Charleston Expansion
Coastal Community Resilience and the Impacts of Sea Level Rise/Climate Change
The Long Savannah Development
In the third iteration (Spring 2016), I attempted to correct for the lack of interdisciplinary majors within a research group by assigning research groups. To aid in the assignment of research groups, each student completed an Oaks quiz that asked the following questions:
List the strategic areas in order of greater interest to least interest
For your top ranked strategic area, list keywords of interest
For your second ranked strategic area, list keywords of interest
List your major(s)
List your minor(s)
List individuals you would like to work with
Students submitted their responses via an Oaks quiz and then I used their responses to assign groups. Matches were made based on strategic areas and keywords; however, not all students receive their top ranked strategic area (most did) as I also sought to ensure that each group contained at least one each major or minor. This mechanism worked well in solving the interdisciplinary problem previously encountered; however, the new problem that arose was that group members wanted a greater say about who was in their group as the “Free-Riding” problem arose in several groups. The Free-Riding problem occurs when not all members contribute equally to the project, yet all group members receive the same grade. Of the 8 research groups in the Spring of 2016, at least 4 registered complaints about one of their group members not contributing.
The Free-Rider Problem
I am planning on implementing two strategies to attempt to mitigate the Free-Riding Problem. First, I plan on introducing a mechanism that will allow students to reveal information about themselves (e.g. work ethic) to other members in the class. This mechanism is a series of group-based homework problem sets in the first few weeks of class and before the assignment of groups. Groups will be randomly assigned. The random assignment of groups will ensure that students are meeting and learning about other members of the class. After the problem sets, students will again be asked to complete an Oaks quiz, but on their quiz there will be additional questions aimed at revealing their preferences for who they do and do not want to work with.
The second strategy is to have students submit peer evaluations of their group members when assignments are due. A portion of the peer evaluation is a Grade Multiplier. Each member of the group assigns every other member of the group a multiplier, which gives each group member control over every other group member’s grade. The purpose of the multiplier is to provide incentive to group members to work hard towards the completion of the project. In the Spring of 2016, I required the students to submit Peer Evaluations at the end of the semester; however, this did not provide strong incentives to students since at the time of submissions final class grades were almost known. It was recommended to me, by a student, to conduct the peer evaluations more frequently.
Peer Evaluations are a useful tool that provide students with information on their performance over the course of the research project. Since the goal of the project is to aid students in developing soft skills, the peer evaluations are particularly effective, since they address each student individually. Herein lies the main problem since each time I require a peer evaluation I cannot write 20-40 individual letters commenting on their performance. The remainder of this blog post discusses the tools I have developed to create individualized letters based on peer reviews in an (semi) automatic fashion. Creating letters in this manner allows me to provide individualized feedback to students while at the same time not spending hours drafting letters.
The letter-creation process requires the following programs/files:
The Form Letter – Microsoft Word Template
Oaks Quiz and Excel File of Modified Data
Microsoft Word Template File
Microsoft Excel Template File
Microsoft Excel Addin ExcelToWord
The procedure behind the automated process is to have students complete their peer evaluations through an Oaks quiz, text-mine their responses, and populate a form letter with student responses. Note that this process relies on student responses on the peer evaluation but does leave open the possibility of directly editing the individualized letters.
[TLT Note: On his own blog, Chris provides instructions for using OAKS, Microsoft Word, and Microsoft Excel to facilitate the peer evaluations described above. He also provides templates and examples. To access this information, please visit https://sites.google.com/site/chrismothorpe/home/group-research-projects]
In this blog, I have discussed the research project that I conduct in my upper level economics classes, two of the challenges that have arisen, and various strategies I have or will employ to overcome the challenges. To overcome group formation problems, I am employing an Oaks quiz and group based homework assigned in order to allow students the opportunity to reveal information about themselves to other students in the class as well as myself. To overcome the “Free-Riding” problem, I am planning on employing a series of peer evaluations, which gives all members in the group some control over the grades of the other group members.
One key to conducting peer evaluations is returning individualized feedback to the student based on their performance. I have also discussed a set of tools which will enable me to create individualized letters in a timely manner. Providing timely and individualized feedback also enhances the learning outcomes of the research project since the project is geared towards student practice of their “soft” skills. Receiving individualized feedback allows students to learn from their experience and develop a stronger set of skills that they can employ in the future.
Our guest blogger this week is Louise Ackerman from Health and Human Performance.
That might be a slight exaggeration. My experiment with blogging wasn’t a total failure, but it also was not the resounding success I envisioned.
Background
As the faculty coordinator for Public Health Internships one of the challenges I face is finding ways for students to share insights as they navigate their field experience. Internships by nature require students rarely to be in the same place at the same time. Yet on the few occasions when they do get together they benefit greatly from comparing notes and “talking shop.” After learning about blogging at the Summer 2014 Faculty Technology Institute, I though I had found a way to bridge the gap.
Over the subsequent two semesters I implemented a class blog, the purpose of which was to provide students with a virtual “space to share experiences—discuss issues and ideas relevant to young professionals, help one another manage field-related problems, raise work-related concerns, and fill each other in on information and opportunities in the Pubic Health arena.”
Public or Private?
I knew what I was aiming for, but was not clear which platform would be most suitable. With the help of TLT consultant, Laura Plotts, I settled on Google Blogger. Because internships are about preparing students for the real world, I wanted a platform they could easily adapt to life and/or work after graduation.
Google Blogger allows you to create a public blog, accessible to anyone with an internet connection, or a private blog, which is accessible only to invited viewers. I opted for the latter for two reasons: I thought students might speak more freely knowing the blog was for class eyes only, plus I was concerned that some might unthinkingly post comments that could jeopardize their internship should co-workers or a supervisor see them.
Lesson #1: I now recommend not going private. If you’re going to ask students to blog, let them get used to the idea that what they post may be read by anyone, anytime, and blog responsibly. Better to learn that lesson now than when a real job is on the line.
Lesson #2: If you want to have private conversations, you don’t need a blogging platform. The OAKS Discussion tool will likely work just as well.
If I Build It, Will They Come?
Developing the assignment was the next task. Normally when it comes to classwork, I’m all about crossing t’s, dotting i’s, and leaving nothing to interpretation. This assignment, however, seemed to call for a more free-wheeling paradigm. After all, blogging is essentially about finding your voice: having something to say, and saying it in a way that engages others. I wanted authenticity, and I had hoped that providing less-than-my-usual structure would spur honest, interesting, creative, provocative, and/or helpful posts.
It didn’t.
After a couple rounds of vapid posts I revised the assignment, taking topic selection out of the hands of students, and instead provided prompts to which they were required to respond. While the quality of posts improved immensely, I sacrificed the authenticity I was looking for. The blog went from student-focused to teacher-led (exactly what I wanted to avoid).
Lesson #3: A student blog should be student-directed. In a traditional class setting students would have time to develop a blog that reflected their interests and concerns within the confines of the course. The structure of this course made that unfeasible.
Topic Selection
Over the course of two semesters I played around with types of prompts, trying to find the ideal mix. I was never able to come up with a topic that generated a true discussion—a back and forth similar to what takes place in a classroom. At best students posted well-thought out comments; beyond that they rarely challenged each other or dug deeply into issues, despite grade incentives to do so.
Lesson #4: The prompts that led to the best posts were inspirational, thought-provoking, and/or relevant to students at this time in their lives. (TED Talks were a great resource.). Prompts requiring free writing yielded the least interesting posts. (Students simply followed the lead of the person who responded first.). I had medium success with prompts that asked for helpful information (e.g. job search strategies and exploring solutions to common internship problems).
Lesson #5: Given the lack of meaningful back and forth, simple reflection assignments would be a viable alternative.
Grading
To earn the minimum credit students had to respond to my prompts; they could earn additional credit by responding to their classmates’ posts, which was my way of encouraging discussion. They were given guidelines for what constituted acceptable original posts and reply posts.
Lesson #6: Grading blog posts is challenging but doable. It’s wise to set an approximate word length (I used a minimum of 250 words for an original post and 150 for subsequent posts), and details for what constitutes quality comments. For me that was:
Thoughtful and/or provocative
On-topic
Well-articulated
Add to the discussion (e.g. comments such as, “I agree” or “I had the same experience” do not count as moving the discussion forward)
Respectful
Bottom Line
I’m not sure if I’ll revise the assignment and try again. While there is plenty of tweaking that could be done, I’m not convinced that blogging is suitable to my objectives for the Internship class. I am, however, thinking of ways I can utilize the technology in a traditional classroom setting.
Our guest blogger is Dr. Karen Hakim-Butt. Dr. Hakim-Butt is the associate dean in the School of Education, Health and Human Performance. During the 2014-2015 year she was asked to serve as the interim department chair for one of the school’s department, Health and Human Performance.
The department of Health and Human Performance has experienced explosive growth over the last number of years (in 2009 HEHP had 289 majors – in the spring of 2015 HEHP had 825 declared majors). Since resources have not grown as numbers have, the department has had to look at doing business differently.
While attending the summer Faculty Technology Institute in 2014, I decided to use my time in the institute to help the department develop a new infrastructure, one that would work more efficiently while handling the incredible growth. We began by developing an OAKS course for the faculty (roster, senior instructors, adjuncts) and staff. Although still learning, after 1 year, we are running the department as if it were a course. What follows are just some of the ways in which we are using OAKS to help the department.
We began by deciding to try to make the course one stop shopping. Upon opening the department page on the top left one will find “NEWS”. Publications, presentations, creative activities, due dates, etc., are posted. It appears to be a great way to share accomplishments and remind folks about upcoming applications, deadlines, etc., without filling up ones email box.
On the top right of the department page one can find a visual of what’s in the OAKS course. This is a living, growing project but currently we have sections on Department Meetings, with meeting minutes, readings to prepare for the meetings and a Google form to request items be added to the agendas. In the Program Meetings category one can find minutes and agendas for all 4-degree programs in the department. Curious what one program is working on or will be working on or want to attend a specific meeting to hear about a topic, it’s all available with a click of the mouse. Committee meetings are organized in a similar fashion with extra private file sharing spaces and discussion boards so the committee can work on projects and prepare them for the public space. It is also a place to post final reports from committees.
Curious as to what students have learned in a required departmental pre-requisite? Under the Syllabi content, one can find both the most current syllabi for all courses as well as archived syllabi.
We have a special content area specifically geared toward adjuncts. We have useful information such as contact information, tips & tricks from our wonderful technology person, Mendi, useful resources, release of liability forms for activity classes, directories, etc. We also have training videos from our previous years’ 2-day adjunct orientation. One can find information on using OAKS, Google Drive, technology resources, administrative resources, teaching resources, apps for teaching activity classes, etc.
T & P is another content area. Under annual evaluations faculty will find samples of how to present summaries of student evaluations, the required yearly self-reflection form, templates for required evaluations, a place to submit faculty and instructor annual evaluations, the annual faculty workload plan, etc.
We are revising the departmental by-laws and they are soon to be posted.
One of our most robust content areas is Advising. We have a Google forms for releasing holds on students and a place to submit that form, all 4 programs of study and road maps, information on wait lists for closed courses including policies, the actual form students fill out to request a spot and submission hold releases and status updates. Information on one of our favorite programs, appointment manager and finally the HEHP orientation presentation power points so faculty/staff will know what was shared with students at orientations.
Lastly, we have the Administrative section. This includes everything one would want to know about the department such as the most current mission statement, org chart, policies & procedures manual, strategic plan, phone directory, office supply order form, research/teaching order form, guidelines for evaluating curricular exceptions requests, instructions on how to print from an iPad, tutorials, final reports, etc. One can also connect with the library, find all travel information and forms, find information about reimbursements and check out laptops and iPads. Etc.
Middle right on the homepage have departmental calendars with opportunities to reserve the conference room, post events & presentations, post meeting days/times, reserve laptops, etc. Finally we have a HELP! Section including information on how to set up your CofC Google apps account, how to get started with Google drive/docs, how to make meeting minutes in the course using Google docs, how to get news notifications, etc.
Overall, according to faculty surveys and feedback, we are on the right track in helping to organize the quickly growing department. It’s a winner and thanks to Mendi, Nancy Phelps, Debbi Hinson and all others who helped move us along!
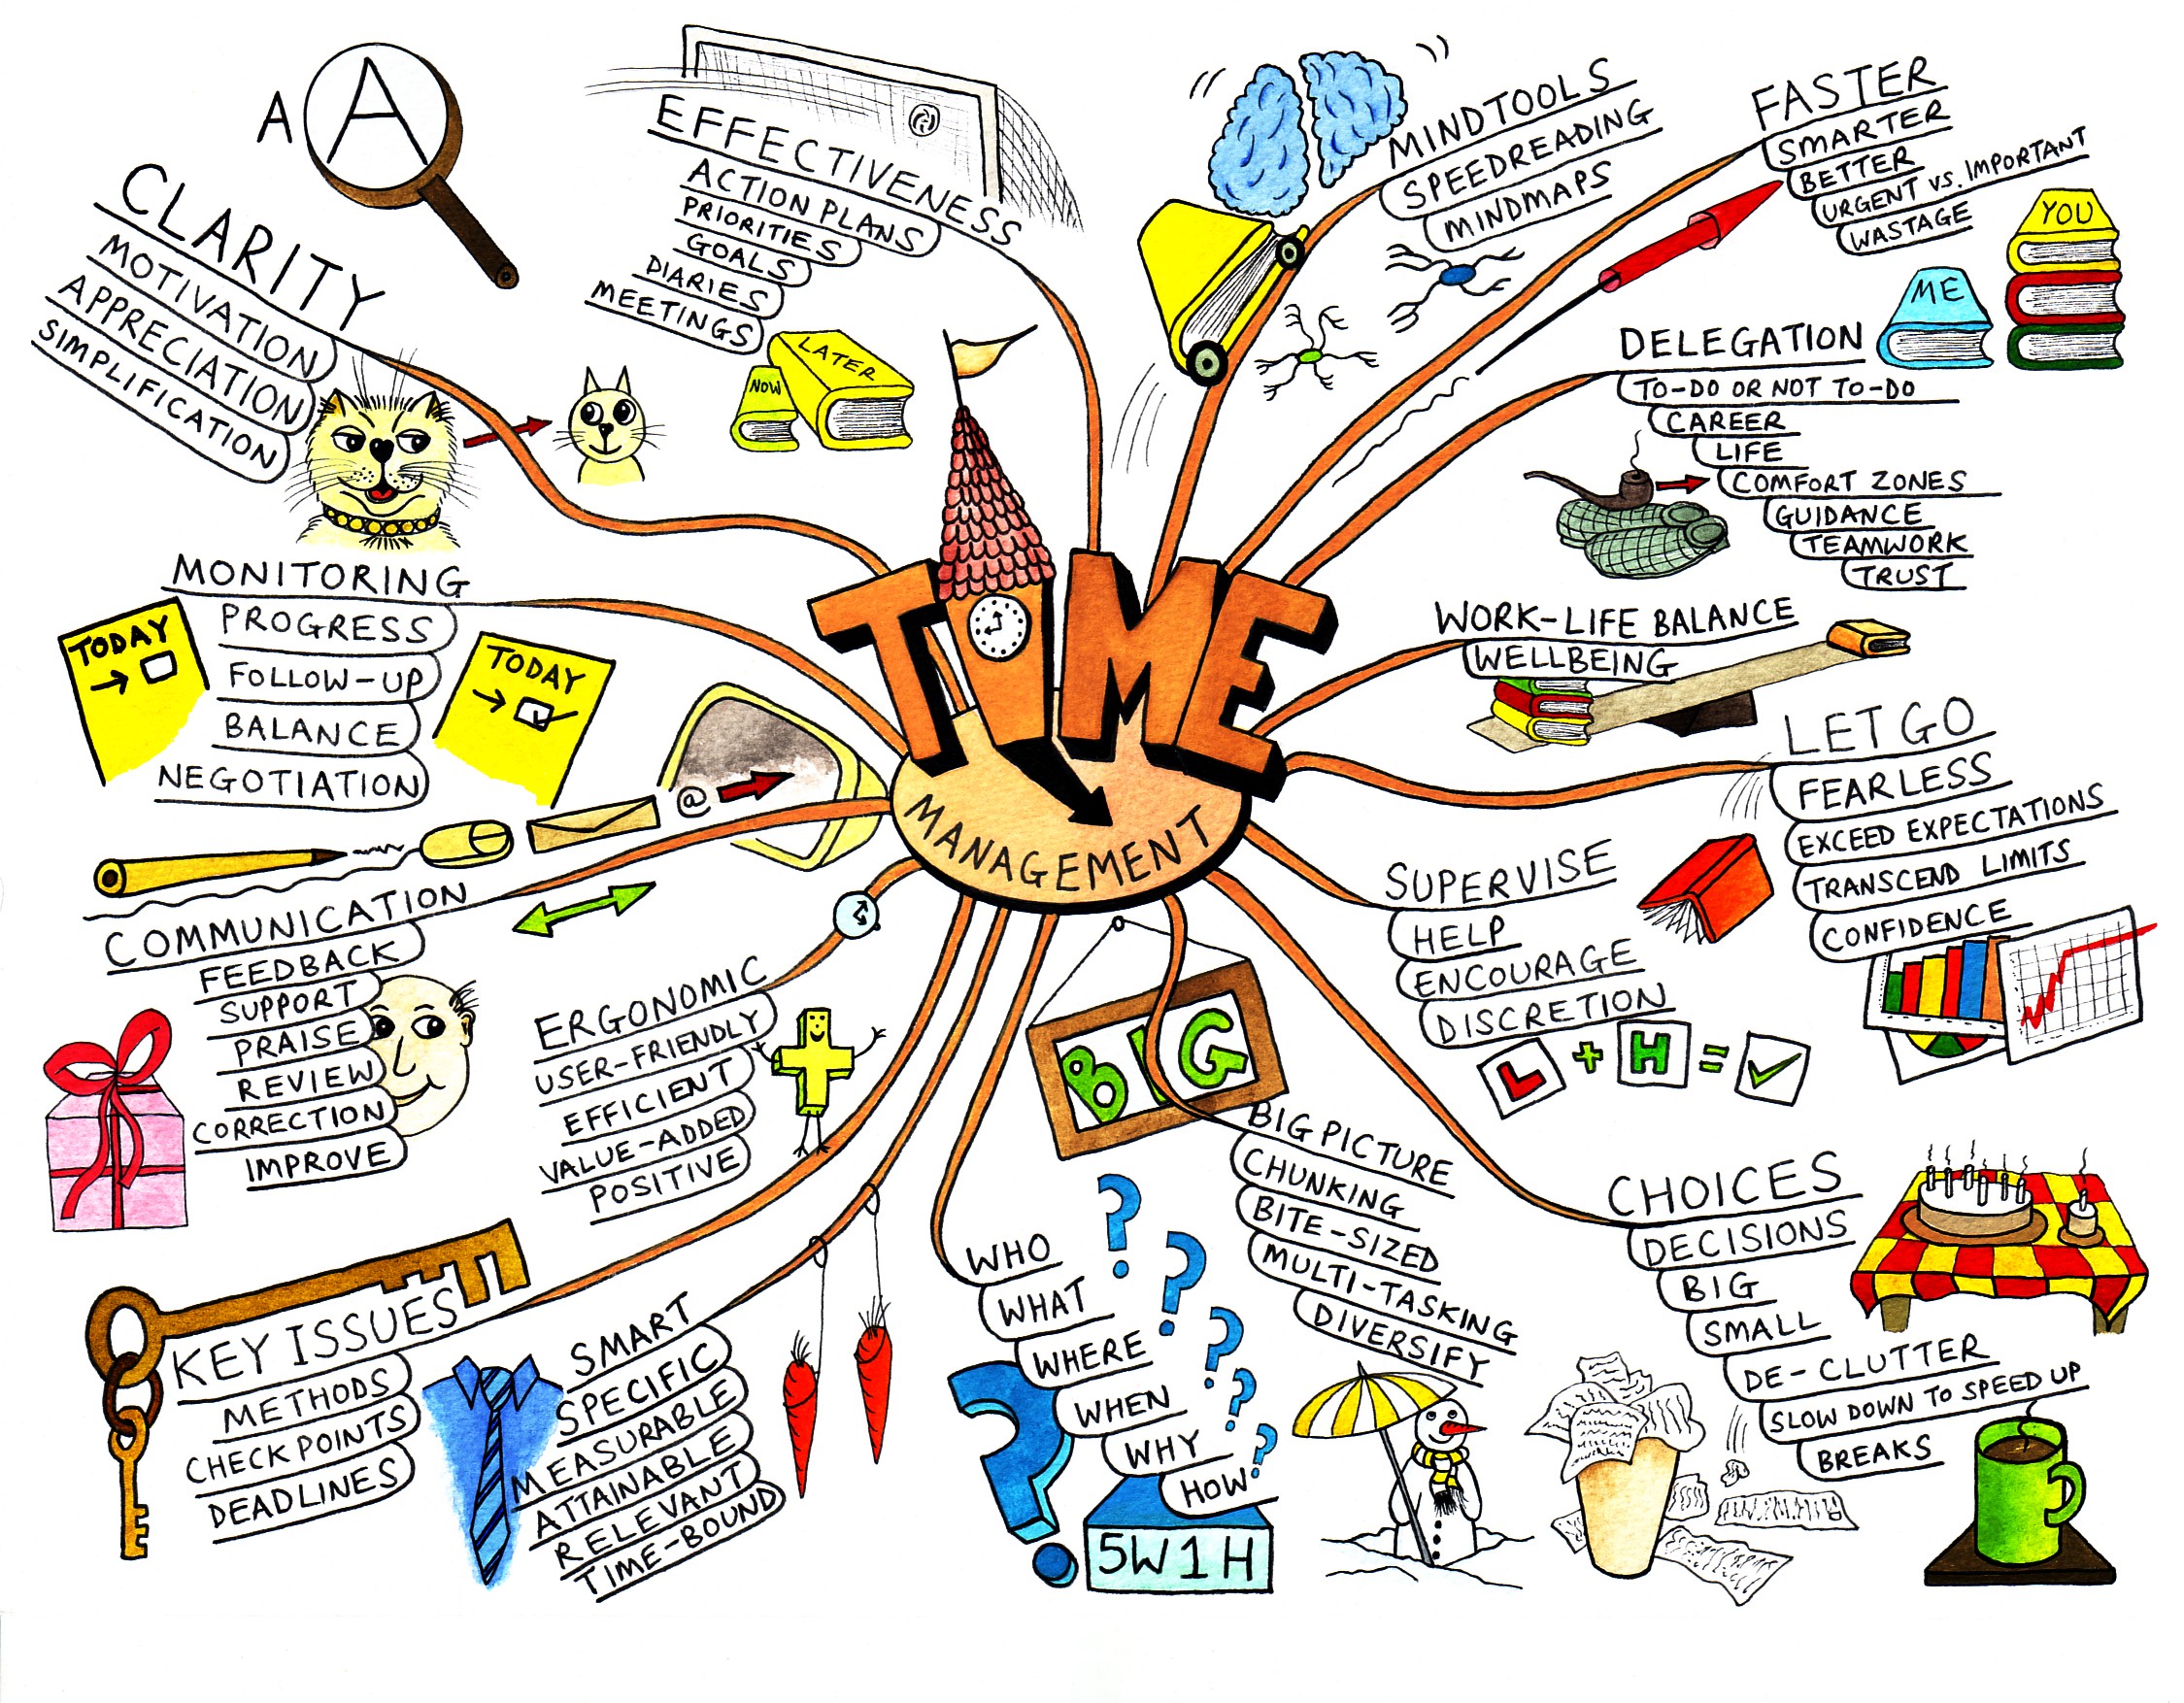
Keonya Booker, Assistant Professor in Teacher Education, recently presented Concepts, Connections, and Constructivism: Mind Mapping for Pre-service Teachers at the 2015 Conference on Higher Education Pedagogy at Virginia Tech. As a result of what she learned at the 2014 Faculty Technology Institute she presented on how she used collaborative idea maps to help students make connections. Below are snippets from her conference proposal
Abstract: Constructivist theory asserts that students attach meaning to their learning by way of predicting, organizing, and evaluating information. Instruction in constructivist-based classes should support students as they actively connect new ideas with prior knowledge. Mind mapping allows students to make associations between both abstract and concrete types of information in creative and imaginative ways. This practice session will explore the use of a popular software program to help pre-service teachers understand major theoretical perspectives in a human development course. Particular attention will be paid to student perceptions of both the tool’s functionality and benefit to learning.
Description of Practice: Mind mapping has myriad uses in education and there are several tools instructors can use to support student learning. At the College of Charleston all elementary and secondary pre-service teachers must successfully complete a Human Development course prior to their fieldwork experience. Since lifespan development traditionally takes a survey approach, breadth of information is emphasized, not necessarily depth. Because we want students to have a strong understanding of a particular topical issue prior to their practicum, the cumulative assignment was developed. For the cumulative assignment, each student group is responsible for exploring a developmental theorist (e.g., Piaget) or current educational issue (e.g., Common Core) and then presenting to the rest of the class. Students are required to use Popplet to coordinate their work and show connections between contrasting ideas. Uses for Popplet include editing, organizing, and drafting mind maps which will be demonstrated in the session. Participants will also see examples of student work and hear how students evaluated the use of the tool in terms of functionality and worth to the overall project.
If you are interested in learning more about Dr. Booker’s presentation or how you can successfully us idea maps in your teaching feel free to contact Dr. Booker or your Instructional Technologist.
Our guest blogger this week is Dr. Adem Ali, an assistant professor in the Department of Geology and Environmental Geosciences. Dr. Ali attended the Faculty Technology Institute in 2014. In this post, Dr. Ali describes his strategies and success using Poll Everywhere in his courses.
Poll Everywhere is an adaptable and now a popular tool that we have a campus license for at the College of Charleston, which makes it free for college instructors to use and makes it possible to use in large classroom settings. After my training at the Faculty Technology Institute during summer of 2014, I immediately implemented Poll Everywhere into my courses and lectures. Since, I have enjoyed using Poll Everywhere and it has increased the level of students’ interest and engagement, transforming the course into active learning. The courses I teach have class sizes ranging from 25 in my higher level elective courses to over 100 in the general education classes.
I use Poll Everywhere to create conceptual questions in multiple formats that can be answered by students instantly and LIVE. I embed the Poll Everywhere polls/questions into my PowerPoint presentations throughout my lectures, and the students can answer by going to a webpage using their laptops and clicking the answer, texting an answer to an SMS number using their smart phones, or by tweeting. This capability has allowed students to use web and cellular devices. It has made the learning experience more flexible, and it has brought it into their world making learning more fun and engaging.
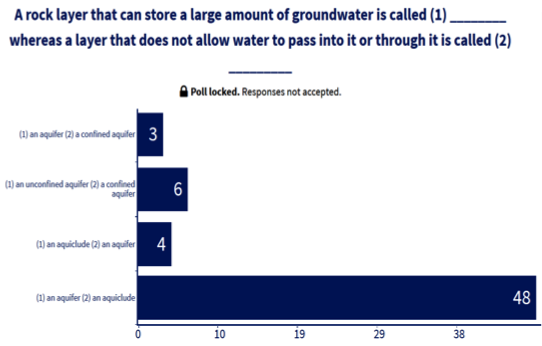
One of the advantages of using this tool is that it allows you to embed the poll/questions into your existing presentations, like PowerPoints. I found this to be very important because it made my lectures more engaging without requiring me to spend a lot of time. I simply included the poll slides throughout the lecture slides. The tool allows the students to watch the answers as they are coming in live. As an option, the live answers can also be hidden until all students have participated, providing the flexibility to adapt to polls for discussion points or to use them as quizzes for assessment. Poll Everywhere also provides the number of responses, providing evidence for level of classroom engagement.
Another important aspect of Poll Everywhere is that it allows the instructor to immediately see the level of comprehension of content based on the response patterns on the polls/questions, providing instructors with the opportunity for giving instant feedback. In my lectures, these capabilities have allowed me to quickly identify content/concepts that were not grasped by the students and we could spend more time discussing misconceptions, and at times revisit topics to help students refine their understandings.
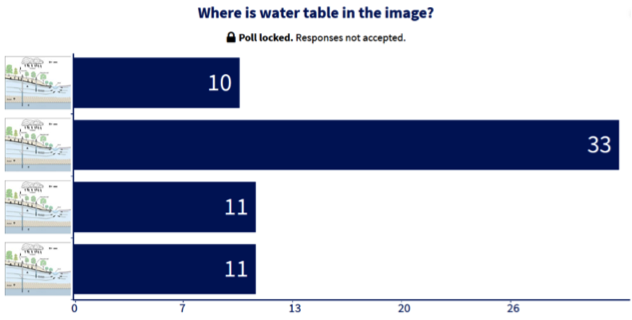
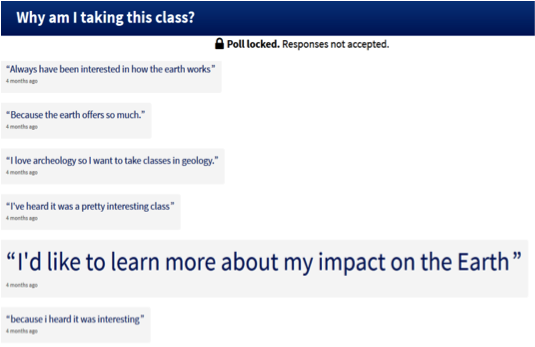
Here are some examples of my Polls:
A multiple choice poll with student responsesA free response poll
I have also used this tool as an attendance record by posting simple questions as a segue to the lecture of the day. I used the attendance data generated by Poll Everywhere for grading individual students on their class participation in the final grade rubric.
The challenges I experienced when using Poll Everywhere all related to student mobile device issues – students with smartphones were unable to participate in certain types of polling and students with restricted phone plans had texting limitations.
Overall, I think Poll Everywhere is a great tool for student engagement and assessment. I plan to continue to use this tool in my future classes to promote student engagement in lectures and also to refine or revisit topics of discussion to maximum students’. To learn more about the College of Charleston Campus license for Poll Everywhere, please visit https://blogs.cofc.edu/tlttutorials/2013/09/10/poll-everywhere/.
Our guest blogger this week is Dr. Kristin Krantzman from the Department of Chemistry and Biochemistry. Dr. Krantzman attended the Faculty Technology Institute in 2014. In this post, Dr. Krantzman recounts her experiences using Poll Everywhere to provide students with opportunities to work on practice problems during class.
Poll Everywhere is a program that allows an instructor to give interactive polls over the internet without requiring students to spend additional money on special equipment. I decided to try using Poll Everywhere as a supplement to my traditional lecture in two sections of the general chemistry course, CHEM 112. CHEM 112 is the second in a two semester introductory course that is taken by students in the sciences, and my enrollment in Spring 2015 was about 45 students per section. This course has an introduction to chemical equilibria, reaction kinetics, entropy and free energy. Fundamental concepts are applied to acid-base reaction, precipitation reactions and oxidation-reduction reactions.
A primary challenge in my course is that many of the concepts in the class are abstract and mathematical. As a result, many students do not immediately understand the material when it is presented. Students are focused at the beginning of class, but their attention decreases when they cannot follow what I am talking about in class. Students need to work out problems in order to learn the material. But, there are many topics to cover over the semester, and there is not much time in class for students to practice problems. Another problem is that the final exam is all multiple choice questions, but the practice problems that students do as homework in the textbook are short answer. I decided to give students multiple choice questions with Poll Everywhere as a way to engage students and allow for practice. I chose to do this because I thought that students would learn more if they were required to think about questions and respond in class. Students showed a greater understanding of the material and improved their ability to answer multiple choice questions.
Prior to class, I wrote the multiple choice questions in Poll Everywhere. One strategy I used was to post a Poll Everywhere question for students to work on as they entered into the classroom. Previously, this time was unused because I could not start class early and we had to wait for all of the students to get settled. This question was on a topic that we had covered in the previous class. This review reinforced student learning. In addition, I often gave students another question to answer, either halfway through class or at the end of class. After the students had answered the question, I displayed the response results. If the majority of students did not respond with the correct answer, I asked the students to discuss the question with each other and then respond a second time. After reviewing the responses, I went over the correct answer and explained why the other answers were incorrect. I chose to put some of the Poll Everywhere questions on the in-class tests, which motivated students to study them.
The students showed a dramatic improvement on the final exam, with average scores increasing by 7% from the fall semester. The students responded on the course evaluations that they liked the Poll Everywhere questions because doing them in class helped them understand the material. They also enjoyed the class more when I broke up the class lecture by having them work on questions that they had to actively work through.
My advice to other faculty is to have the answers to the Poll Everywhere questions count towards their grade and write this into the syllabus. Students could be given credit for answering questions even if they are not correct, which would reward students for attending class and actively participating.