Our recent OAKS (user interface) upgrade, Daylight, introduced several new features, including course banners. And while course banners can be a great way to generate (initial) interest in your course, they can also confuse students if the system-generated images are unrelated to your content (e.g., architecture, rainbows, mountain landscapes, etc.), as is often the case. With a custom course banner, not only can you choose the image, but you can also add your contact information, class meeting time and location, and office hours. Sure, it’s on the syllabus, but…
So, how do you create a custom course banner?
pre-design checklist
To create your own custom banner, you will need:
- a free Canva account.
- a free Pixabay account.
- to explore and experiment with both Canva and Pixabay to learn “the basics”.
Need additional help with Canva? Check out their collection of 25+ step-by-step tutorials.
Designing your custom banner
1. Log into Canva and click Use custom dimensions (top-right corner).

2. Enter 2400 x 980 pixels and click Design!. This is the preferred banner size, according to D2L.

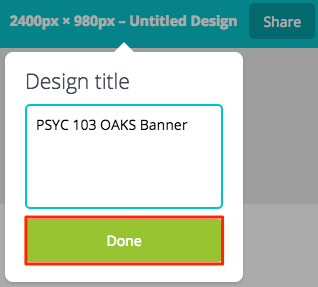
3. Click on 2400px x 980px – Untitled Design (beside the Share button); enter a Design title (e.g., PSYC 103 OAKS Banner); and click Done. Click File > Save (top-left corner).
4. Click the BKGROUND tab (on the left) and select white. Pause your work in Canva, and open a new tab in your browser.

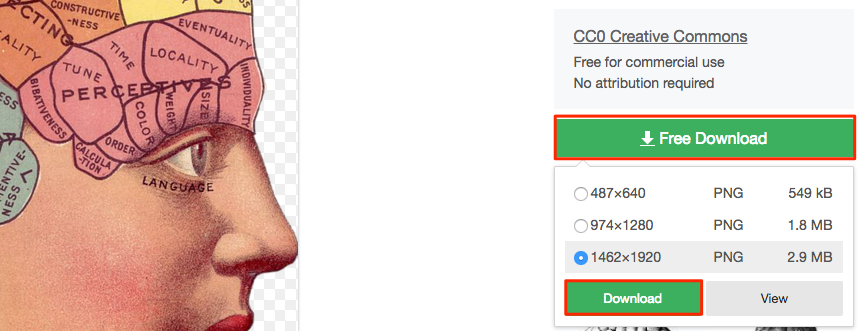
5. Log into Pixabay and search for an image relevant to your subject area.

6. Select an image and click Free Download. Choose the largest size (PNG) available and click Download.
7. Open your “Canva” browser tab and click the UPLOADS tab (on the left). Click Upload your own images and select the Pixabay image from your Downloads folder (or other file-save location).

8. Click on the image to add it to the banner. Move it to the left side of the banner and resize it appropriately.

9. Click the TEXT tab (on the left) and select Add subheading.

10. Click on the Add subheading textbox to change the text–adding your name, when and where your class meets, your office hours, etc. Feel free to change the font and font size, but use a dark color (preferably black) so it shows up against the banner’s gradient (visible in OAKS). Position your text on the right side of the banner, vertically centered.

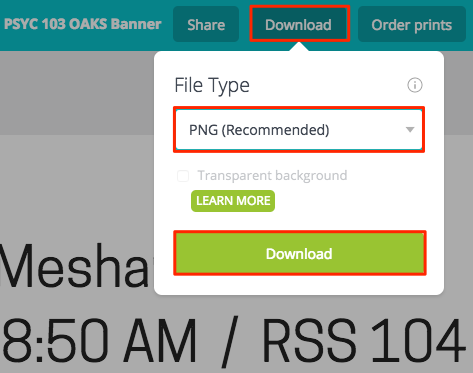
11. Although Canva periodically auto-saves your design, it’s a good idea to click File > Save before you download. Click Download; select PNG (Recommended); and click Download.
uploading your custom banner
1. Log into OAKS, and click on your course. On the current banner, click the … (menu) button (top-right corner) > Change Image.

2. Click Upload (on the right) and select Browse under Course Image. Click My Computer; select Upload, or drag and drop your banner image into the box; and click Add > Save. Click Course Home to see your new banner. Enjoy!

Don’t Forget
- When creating a banner in Canva, use custom dimensions: 2400 x 980 pixels
- Select a white background and black (or dark) text for the best visibility
- Keep text vertically centered on the right side of the banner
- Use Pixabay for CC0 images
Have questions and/or need help with this project? Contact your instructional technologist or email us at tlt@cofc.edu.
