In the past, Skitch was my go-to app for creating annotated screenshots. Sadly, Evernote stopped supporting Skitch in 2015. As someone who uses a Mac, PC (Windows), and Chromebook, I’ve been searching for a free (or inexpensive) solution that works on all platforms. And, Explain and Send Screenshots is it!
What is Explain and Send Screenshots?
Explain and Send Screenshots is a free Google Chrome Extension. It works on any computer using the Google Chrome web browser. Unlike most extensions, Explain and Send Screenshots does not “Read and change all your data on the websites you visit”—making it a safer option.
How Does It Work?
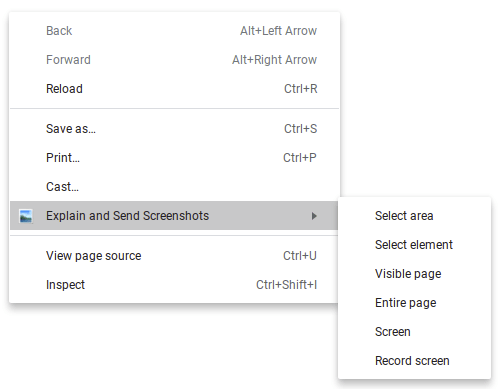
Once you’ve added the Explain and Send Screenshots extension to Google Chrome, you can click on the extension’s icon (see image below) to take a screenshot (image) or screencast (video) of any webpage.
You can also right-click on a webpage to quickly access the context menu.
No webpage, no problem. You can annotate on any image (.png or .jpeg) via the Open file… option.
What Are Its Features?
After you take your screenshot, you’ll have several annotation options: circle, square, arrow, line, draw, text, number (and text), highlight, and blur. Blur is especially useful for concealing sensitive information, like students’ names.
Annotations Example
When you’re done annotating, you can copy/download/save the screenshot (image) as a .png or .jpeg (image format can be changed under options). Screenshots (image) can also be saved as .pdf using Chrome’s Print… > Save as PDF option. Screencasts (video) are saved as .webm, which can be viewed in any web browser or VLC (media player). They can also be easily uploaded to YouTube.
Do you host your lectures on YouTube (unlisted) or share other videos with your students? If so, you and your students can use VideoAnt to take notes or leave comments during video playback, anywhere on the video timeline. VideoAnt is a free online application created by the University of Minnesota’s College of Education and Human Development. Check out the video below to learn more.
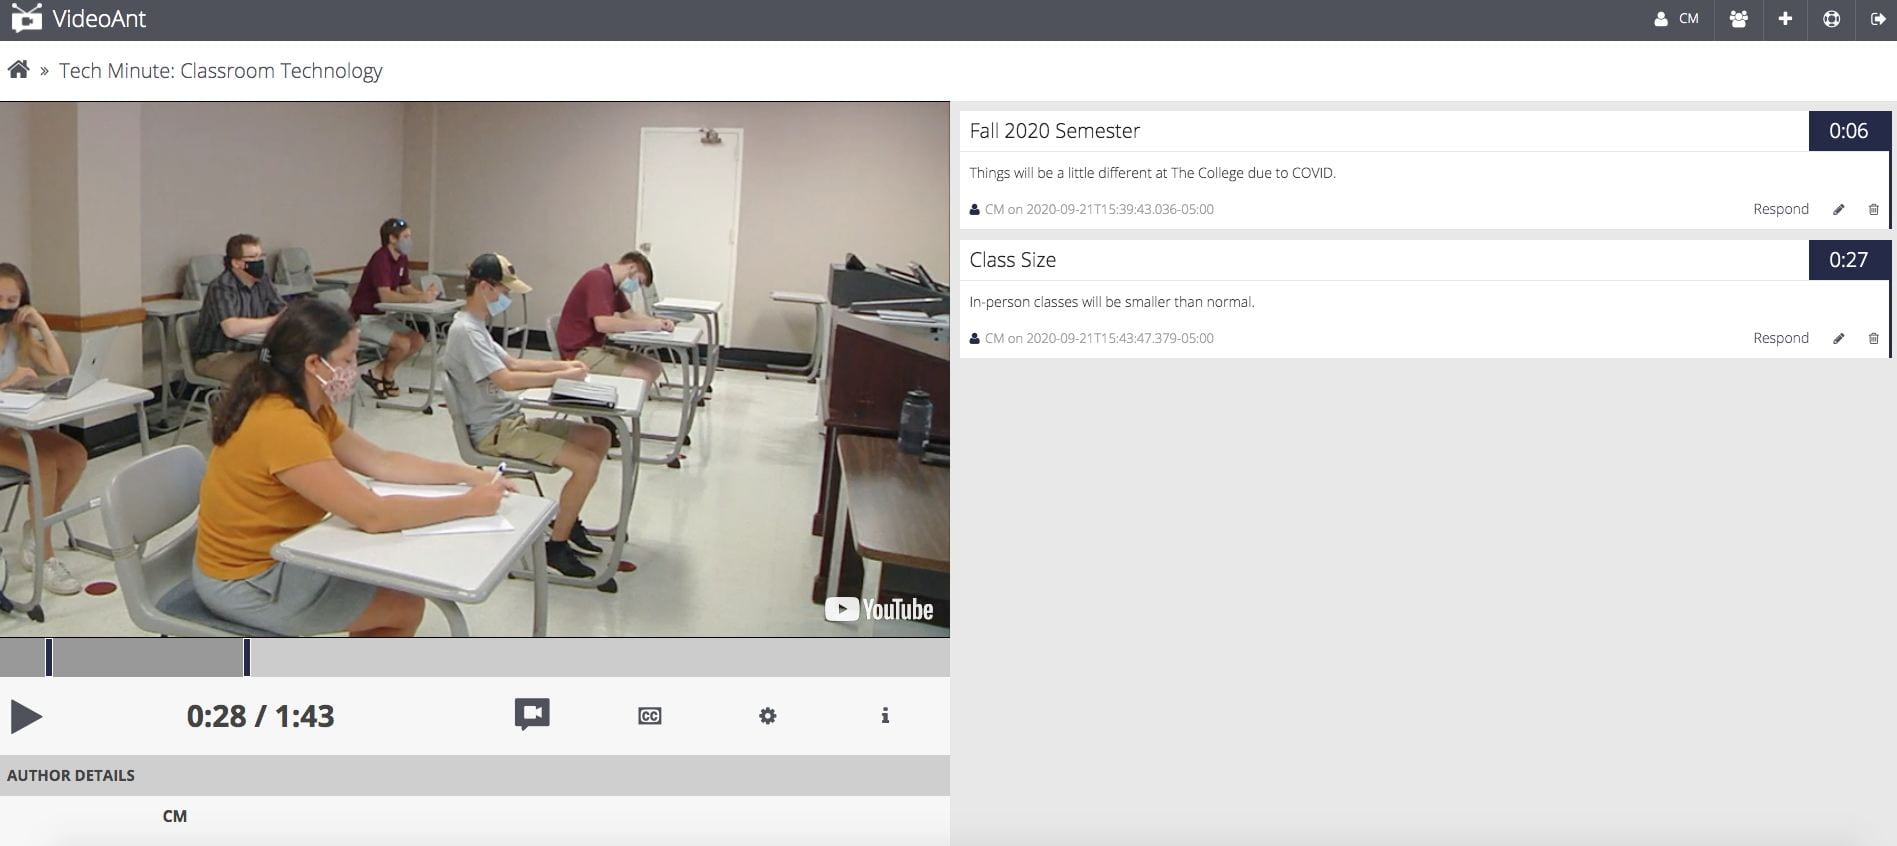
What Does an Ant Look Like?
I tested VideoAntby uploading IT’s recent Tech Minute: Classroom Technology video. Take a look at the interface below. During playback, I quickly added two notes. Notes are flagged on the video timeline and appear on the right with corresponding timestamps.
Click on the image to zoom.
Exporting and Sharing Your Ants
When it comes to sharing, VideoAntgives you and your students a few different options. First, I tested the Embed Code in OAKS. The VideoAnt interface (i.e., video and notes) displayed properly, but, unfortunately, my notes were not flagged correctly on the video timeline. Thus, I cannot recommend this method of sharing at this time.
You can also Export your notes or comments in a variety of formats. Here’s what the Text export looks like:
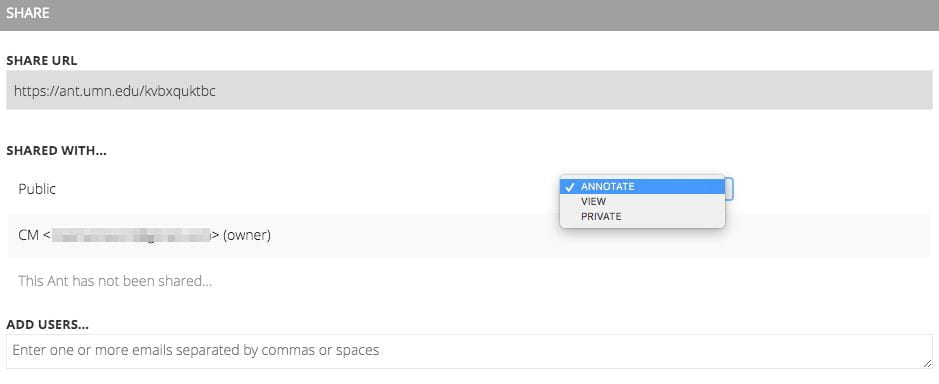
Finally, you and your students can share your VideoAnt via a link or make it Private and Add Users—similar to Google Docs.
If you’re like most faculty, you receive an inordinate number of questions from students that they could have easily answered themselves if they only consulted the syllabus. For years, I’ve pondered the question: why don’t students read the syllabus? The answer I’ve come up with after a lot of research and talking with students is that syllabi are boring. Yep, I suggest it’s as simple as that. As I’ve written about before, syllabi tend to feel cold and sterile like those Terms of Service agreements no one actually reads. In addition, their format hasn’t changed much in the past twenty years to reflect the amazing technological advancements in graphic design and information transmission. Should it truly surprise us that students avoid reading these inhospitable documents?
In other blog posts, I’ve suggested ways to make your syllabus more welcoming, engaging, and learner-centered. Today, I’d like to offer two tips specifically regarding the format of your syllabus.
Construct Your Syllabus Like an FAQ
Students likely ask you the same questions from one semester to the next: Do you accept late work? What is your attendance policy? Can I buy the textbook used or a previous edition? How am I going to be graded? Can I take the final exam early so I can leave campus sooner? If you’ve been paying attention to these repeat questions, you’ve already compiled a list of FAQs (frequently asked questions) that students seem to care the most about. To encourage students to locate answers themselves, make the information as accessible as possible. Organize your syllabus into distinct segments with very clear headings so students can scan the pages and quickly find what they’re looking for. You can also make your syllabus more reader-friendly by using bulleted or numbered lists and constructing shorter paragraphs. These organizational features create greater white space, which is easier on the eyes, and also makes the text seem less dense and, therefore, less intimidating.
Create a Digital Version of Your Syllabus
Rather than presenting students with a Word document or PDF, consider creating a digital version of your syllabus. What do I mean by “digital”? I’m referring to creating your syllabus using a Web 2.0 application and hosting it online. For example, creating your syllabus using Google Docs, Google Slides, Populr, WordPress, or Piktochart.
There are numerous reasons to create a digital syllabus. First, it transforms a traditionally static document into a dynamic and responsive experience. You can embed links to web pages, documents, or videos, allowing you to share more information while preventing “syllabus bloat.” Secondly, using an online tool makes it easier to “spice up” your syllabus with color and graphics (such as memes and gifs) which make your syllabus more inviting to students. Third, a digital syllabus is likely more mobile-friendly than a Word document or PDF. Most students want to access your syllabus (and other course materials) on their phones but relying on tools designed to create print materials often do not display well on mobile devices. Finally, the fourth reason to create a digital syllabus is that it is easily shareable. You can post the link to your syllabus just about anywhere — in an email, on your department’s webpage, on your own professional webpage or blog, and even on your department’s social media accounts to encourage greater visibility which could increase enrollments.
An Important Note About Accessibility
If you decide to experiment with digital syllabi, it’s important to keep accessibility in mind. You want to ensure all students can consume the information contained in your syllabus regardless of ability. For example, if you include images in your syllabus, you should also add “alt text” that describes the image so screen readers can detect that information and relate it to the user. I recommend keeping on hand the old version of your syllabus, which is completely text-based, in case you have a student who is visually impaired. If you are unfamiliar with screen reading software or the specific needs of our students with disabilities, I encourage you to reach out to the folks in Disability Services.
Now that I’ve convinced you to create a digital syllabus, check out these examples for inspiration:
Google Slides syllabus(a little passé since students don’t use Facebook as much anymore, but gives you an idea of what’s possible with Google Slides)
Want to learn more? If you are a graduate of the Distance Education Readiness Course, you can participate in the Distance Education Extension Program and access the “Crafting a Learner-Centered Syllabus” mini-course. If you haven’t taken the DE Readiness Course yet and want to know more, please visit http://blogs.cofc.edu/dereadiness/
Looking to shake up lectures from the typical Powerpoint and searching for a vehicle that better integrated student response in the presentation, I experimented with Nearpod during the Spring 2016 semester. This app allows an instructor to create a presentation and then push a slide show out to a student’s personal device. Perhaps more importantly, it features built-in activities and quizzes that require the students to interact with the presentation. Student responses from these exercises are available for the teacher to view and subsequently share with the class if they wish. The answers can also be saved and viewed later by the instructor for grading purposes or more in-depth evaluation.
The free version of the application gives you access to the basic features while purchasing the next level opens up more student activity modules. The Nearpod website allows you to create your presentation but the design capabilities are limited. It is easier to create the look you want by creating your slides in Powerpoint, saving them as images, and them placing them in your Nearpod presentation. You can also add activities like open-ended questions, free-draw, and quizzes to your slides. There are numerous Nearpod lessons available for free or a small fee. However, most of these are geared towards secondary school students.
Once you have created and published your presentation, you are ready to use it in class. When you run the presentation, the students will use the code provided to logon to the presentation and will see the individual slides on their own computers or tablets. You can open the application on the classroom computer, but I found it worked better to run the presentation from my iPad and log the classroom computer into the presentation as the students do. This allowed me to project on the big screen what the students were also seeing on their own screens and reference it as we worked.
The first time I used Nearpod with my classes, I requested students bring a laptop, iPad, or other tablet to class with them. While it is possible to view the presentations on a cellphone, the small screen size limits the students’ ability to complete activities. Unfortunately, for a class of 20 students, I only had 4-6 students bring devices with them. This meant that groups of 3-4 students were working together which ultimately led to one or two students being less engaged in the activity. Luckily, TLT allows instructors to check out iPads for classroom use on a short-term basis. Doing this allowed us to have 1-2 students per device which led to greater student participation.
One of the downfalls of the application is that the whole class must stay together. This can be difficult if the students are working on an activity at different rates. In particular, if a student hasn’t submitted a response to a question, once the instructor pushes the next slide, half-finished responses will be lost. To alleviate this problem, I asked students to submit any partial responses when we were ready to move on.
One of the great things about Nearpod is that you can view the students’ responses and choose which ones to show to the entire class. This could allow you to highlight a particularly interesting response or perhaps a response with a common error that you wish to address. When working with grammar, I often prefer to have an incorrect response given instead of a correct one because it creates a teaching moment. However, students often only want to volunteer a response when they are sure it is the correct answer. With Nearpod, every student submits an answer, and I get to decide which ones we should look at together. I’m also able to quickly judge if many students are making the same mistakes.
The free draw activity also lends itself well to the language classroom. I created a lesson in Nearpod on prepositions of location. Using the free draw activity, I gave my students simple commands for drawing a picture. (Draw a girl. Draw a flower next to the girl. Draw a boy behind the flower. Etc.) Everyone was able to draw and then we were able to easily view the students’ drawings as a class and discuss them further in the target language.
Overall, Nearpod worked well to increase active student participation and provided a different way of doing things that helped engage the students. It also forced me to slow down a bit and gave me a better idea of how well the students were keeping up. Additionally, the premium features include being able to assign the presentations as homework which would be interesting to try as part of an online course.
Today’s Faculty Guest Post is from Glen Riecken, Visiting Professor of Marketing. Glen attended TLT’s 2015 Faculty Technology Institute. In this post, he reflects on the process of incorporating VoiceThread into his MKTG 302 (Marketing Concepts) courses.
I am writing this blog post based on my experience incorporating VoiceThread into my MKTG 302 classes over the past two semesters. My use of VoiceThread resulted from a confluence of three events: attendance at TLT’s 2015 Faculty Technology Institute where I was first exposed to VoiceThread, preparation to initially teach a hybrid express course at the North campus in Fall 2015, and a nagging desire to create a flipped classroom experience in my live classes. The hybrid course required more online so I needed a way to deliver content in that medium. Having read more and more about the idea of a flipped classroom, I began to see its advantages, especially in generating greater student class engagement in all my classes. When I was exposed to VoiceThread at the TLT FTI, it struck me as an ideal tool to assist in accomplishing my goals.
Here I will briefly discuss VoiceThread, how I use it and some pros and cons from my perspective.
VoiceThread (VT)
VT is a content delivery and blogging tool, allowing people to communicate through both visual and audio modes in a dynamic and asynchronous fashion. This makes it ideal for creating an interactive environment naturally capturing today’s student immersion in instantaneous interpersonal communication tools. After posting an initial message, others are invited to comment on it. They may answer questions, ask questions or post comments in text, voice, images or video formats.
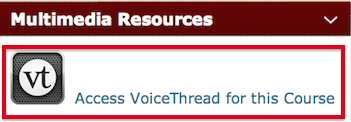
Access VT through the OAKS homepage.
College of Charleston faculty and students receive free accounts with full accessibility to VT’s many features. It is easy to learn and use. Tutorials are available through TLT, VT and YouTube.
VT is cloud based so works in almost every environment as long as one has access and a device (including mobile) that has Adobe flash. Course homepages have a VT link established and a single click will navigate to VT content for that course. It is fully integrated into OAKS. In the content module in OAKS, I have an outline for each section of the course and, as part of the outline, also provide a direct link to each chapter’s VT. I know it’s redundant, but students will be students.
Creating VT Lectures
I use PowerPoint® (PPT) in my class lectures and had already built a set of slides for each chapter in the text. The first task was to import a slide show into VT. I learned immediately that VT and PPT do not like each other. The secret I learned (thanks to Jessica Smith) was to first save the PPT in pdf format. Once that was done, I assumed the imported file was ready to go. However, another impediment for me was that animations are lost. I use animations to bring in various slide elements sequentially as I discuss them in class; students are more likely to pay attention rather than trying to read an entire slide when I am still talking about the first bullet point. There is, as far as I know, no way around that with VT and this, to me, is a drawback to VT. Similarly, my occasional odd sound effects in some of my slides do not transfer.
VT is more accommodating with Word® but I have noticed that sometimes the formatting is changed a bit. The editing features of VT do not seem to allow an easy fix. After some trial and error, I found that making changes in the Word document itself and then uploading again will often, but not always, produce the format I wanted but this seems like an excessive waste of time. Now, for the few Word documents I use, I don’t worry with the format differences.
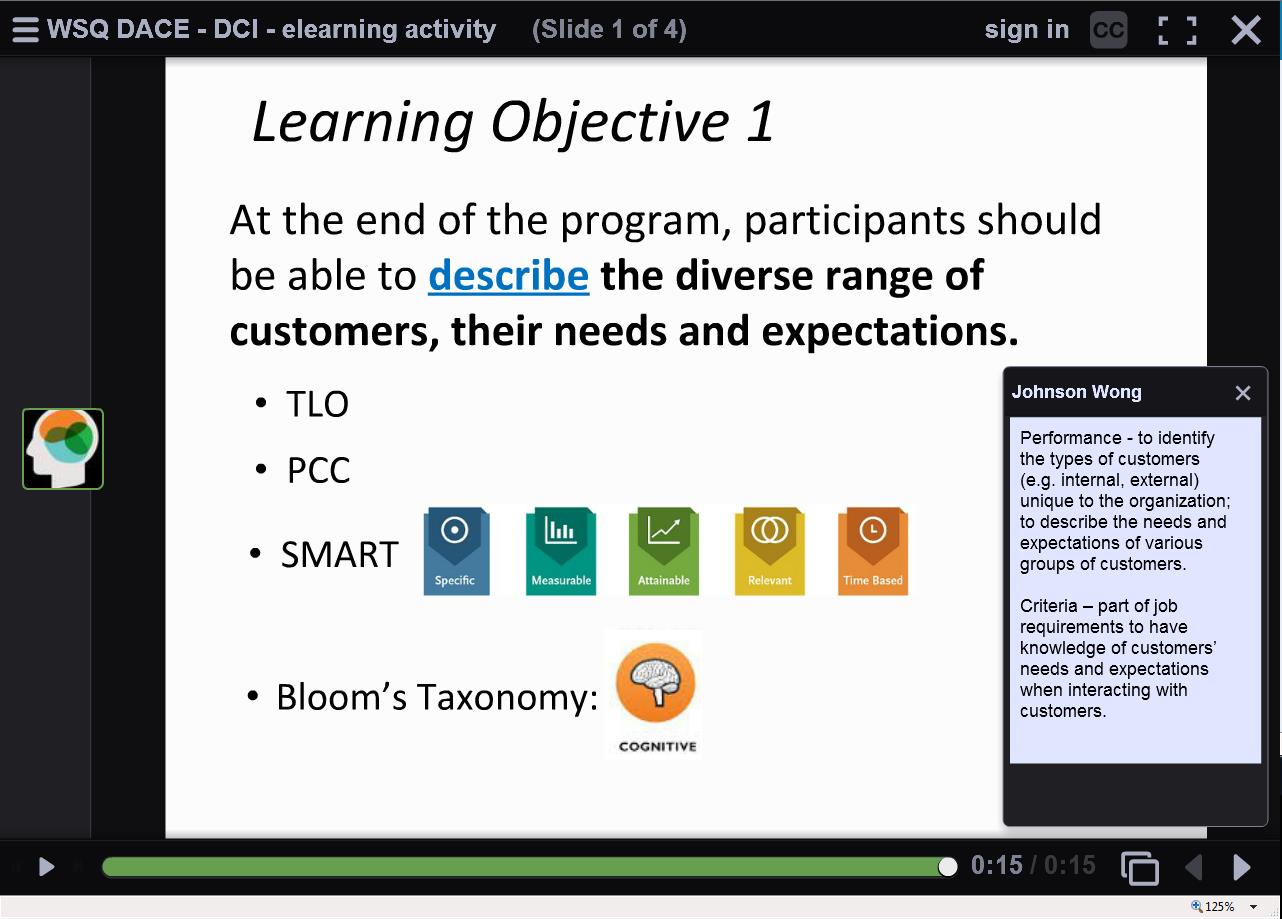
An example VT slide with text comment.
Initially I began recording using the built in camera and microphone on my desktop but soon found the quality of sound was not great and I didn’t like having me show in a little box on the screen, visible to all. An option in VT is to not have the visual box of you show so that part was easily solved. A venture to an electronics store and $30 produced a nifty headset with dropdown mic (mine is a Logitech®) that works great. Incidentally, I chose a corded set since several reviews I read beforehand suggested that cordless sets don’t have the same sound quality. Now I was set to go! By the way, in my last set of instructor evaluations, one student commented that I have a “radio voice” (which I guess is a good thing and goes along with my face which is also ideally suited for radio).
A recording session involves opening slides one at a time and talking about the key points you wish to make. If desired, audio and visual clips may be added (say a YouTube video) as can annotations. For example, in a self-introduction VT, I superimposed a set of dotted lines on a map to illustrate my moves from living in the frozen Canadian prairie to the warm climate of Charleston.
After recording each slide the sound may be reviewed. A drawback, though, is that if a particular piece of sound needs revamping, the whole slide must be re-recorded. Otherwise, the slide may be edited in various ways. Additional slides may be inserted at any time. For example, a good practice is to have a break about every 15 minutes or so. So, after recording a slide show, I can see how long the entire thing is (I shoot for for about 30 minutes) as well as each slide. After adding the length of slides until about 15 minutes and determining a natural break point as close to that as possible, I then insert a “Break in the Action” slide. In these slides I suggest the students relax for a moment to have a bathroom break or have a beverage or take the pooch for a stroll or (not being a cat person) to put the cat outside and lock the door.
VT has a number of options that allow for customization. One pertains to slide advancement. By default, slides are set to advance automatically every 4 seconds but that is easily changed to any desired length or the automatic advance may be turned off which is what I do. Student feedback indicates this is a desired feature, allowing students to go through the slides at their own pace and replay a slide if they wish. They also may stop the presentation at any point and pick it back up later.
Although I have a standard title page in my PPT lectures, another VT option is to add cover art so that each chapter could begin with a picture, for instance, that would match the content. The cover may also be other types of files. So far I have resisted temptation to put links to cat videos as covers for the “Break in the Action” slides. Since I teach marketing I could make a chapter about pricing have a cover slide with various monetary symbols.
Another feature worth noting is that the audience for the VT creation can be made public (open to anyone with a VT account) or restricted to a particular audience. I ensure that my lectures are shared with my classes but are not generally publically available. I don’t need any more hate mail from cat lovers.
Using VT
Students are asked to listen to the VT lectures prior to class discussion. Requiring this makes the acquisition of much of the content up to them, providing more class time for discussions and exercises and moving me towards more of a flipped classroom. Students are not passive listeners to the lectures (other than when they undoubtedly nod off). One feature of VT allows them to “doodle” by making temporary marks on the slides; they might, for instance, circle something to highlight it. These doodles last only a short time so the slides are not inundated with multiple doodles.
Example comment on a VT that others can respond to.
During the lectures I often ask questions, encouraging students to respond. This interactive feature is probably one of the biggest advantages of using VT. Students may respond directly in a number of ways. The responses I have received so far have been text but VT has several other options including microphone, webcam, phone, and audio-file upload. I seem to get a lot more written comments than I do verbal ones in a live class setting. Comments may also be directed at other students’ comments so that an interactive environment is created. Although I have not used this feature, it is possible to require that comments be moderated first so that any inappropriate ones may be filtered out. So far there has been no issue so I continue to labor under the assumption that college students are sufficiently mature to know not to make offensive comments in such a forum.
A second big advantage of VT is that the interactive element allows students to collaborate on projects. In my MKTG 302 classes I do some group activity but so far have not required students to use VT in this regard although I plan to start in the Fall 2016 semester. I have been using the OAKS “Group” feature but now think that VT will be an easier forum for both students and me. For example, one assignment I use now and then is to have groups of 5 -6 students discuss a topic such as whether the attitudes of men and women towards shopping is changing. In VT it will be easier to quickly see comments and participation rather than the more convoluted method in OAKS.
One last feature that I would like to use in VT is integration with the grade part of OAKS. VT is capable of making the integration but I do not know if CofC allows grades to be imported from VT. I use a publisher website for a number of assignments in the class and until very recently CofC would not permit the grade integration feature to work. If it is permissible, I will start using the grade integration feature this fall. [Note from TLT: this is a new feature in VoiceThread that we are currently exploring. If we are able to offer this feature, we will inform the campus community]
Student Feedback
Student feedback from using VT has been very positive. Students like the flexibility of choosing when to listen to the lectures. They also like their availability for study purposes. Some report liking the ability to listen at their own pace and being able to go back and listen to chosen slides again if needed. A few students indicate they like the comment feature where then can post comments rather than verbalizing them in class. And some, inexplicably, enjoy my cat comments.
From Blab’s site “a platform for publicly broadcasting live video conversations or talk shows.” Blab allows for live video conversations. In addition to a host you can have 3 other people talking live at once on a split screen. All Blabs are public so an unlimited number of people could also just watch.
Use it for debates, discussions, or a podcast which you as the host have the option to record. The recording can then be accessed via a url, but as host you will also be emailed a copy ( an MP3 & MP4). A Recording or “Replays”cannot be deleted, but as the host you can make your “Replay” public or hidden.
There is also a screen share and co-host option .
If you did not want to host a Blab then watch other live video conversations on topics or specific content that you are interested in. Search by a keyword then choose a Blab that interest you by clicking the “Watch” button.
Things to be aware of:
You need a Twitter account in order to log in
Although you can choose which callers to let into your Blab and they are the ones then that can ask questions and you can screen share with, “Blabs” are always public. I suggest you review the Privacy policy before you host a Blab: http://cdn.blab.im/blab-assets/privacy-policy.pdf
Does this scenario seem familiar? You’re in the midst of a team project. One day you realize that you’ve been playing phone tag with one colleague for a week; another colleague keeps emailing Word documents; while the rest of the team is trying to work in Google Docs. No one is communicating well and collaboration is slow. What can you do?
RealTimeBoard is an online collaborative workspace that features an infinite digital whiteboard. In addition to typing and writing on the whiteboard, teams can add post-it notes, images, videos, documents, spreadsheets, Google Drive files and more. RealTimeBoard also provides a variety of templates, including timelines, Gantt charts, storyboards, calendars, and SWOT analysis grids. Because it’s an online tool, all collaborators can access your shared board on any device at any time. Boards can also be exported as image files or PDF.
The folks at RealTimeBoard have kindly granted educators free access to their premium features plus unlimited collaborators! So it’s a perfect tool for research projects and to use with your students. Request your account by providing your college email address.
Uses: Any form of collaboration, such as brainstorming, concept mapping, storyboarding, planning, etc.
I would like my colleague, in Ohio, to speak to my class about his research on wormholes. Unfortunately, he’s not very tech savvy. Is there a way to record him without him having to use a computer or camcorder–perhaps over the phone? Thanks in advance.
Sincerely,
Professor Richard “Dick” Solomon
Physics
Dear Professor Solomon,
Welcome to CofC! Rumor has it that you and your family traveled a great distance to join us 🙂 To record your colleague, over the phone, we recommend VoiceThread–a web-based, content delivery application that allows users to assemble and narrate media-rich presentations that can be easily shared with others. What sets VoiceThread apart, from other online content delivery tools, is that it permits viewers to comment on the content being shared–perfect for confirming understanding and encouraging discussion. And, not only do we have a site license for faculty and students, but VoiceThread is also integrated into OAKS.
To get started, view our detailed tutorial and contact your colleague to arrange a date and time to record him, preferably on his office landline. Next, Create a new VoiceThread presentation–be sure to add a Title and upload an image via Add Media (e.g., a wormhole). To initiate the call, Edit the VoiceThread and click on Comment. Open the commenting options (above the timeline) and click on Phone Comment (see image below).
Enter your colleague’s ten-digit phone number and click Call Me (see image below). VoiceThread will call him, within thirty seconds, and invite him to comment. When your colleague hangs up, his comments will be processed and automatically added to the slide.
Add a few discussion slides/prompts after your colleague’s comments and share the VoiceThread with your students.
Please contact your instructional technologist, if you have additional questions or concerns, and check out our upcoming training sessions at http://tlt.eventbrite.com.
ProfessorSolomon is from what late 90’s television series? The first faculty member to email tlt@cofc.edu, with the correct answer, will receive a TLT (BPA-free) water bottle!
Here at the College we have a couple of blog options: WordPress (which you are seeing now) and Blogger which is part of the CofCs Google apps for education suite of tools. The main difference between the two is that students cannot create a blog using WordPress, but they can with Blogger.
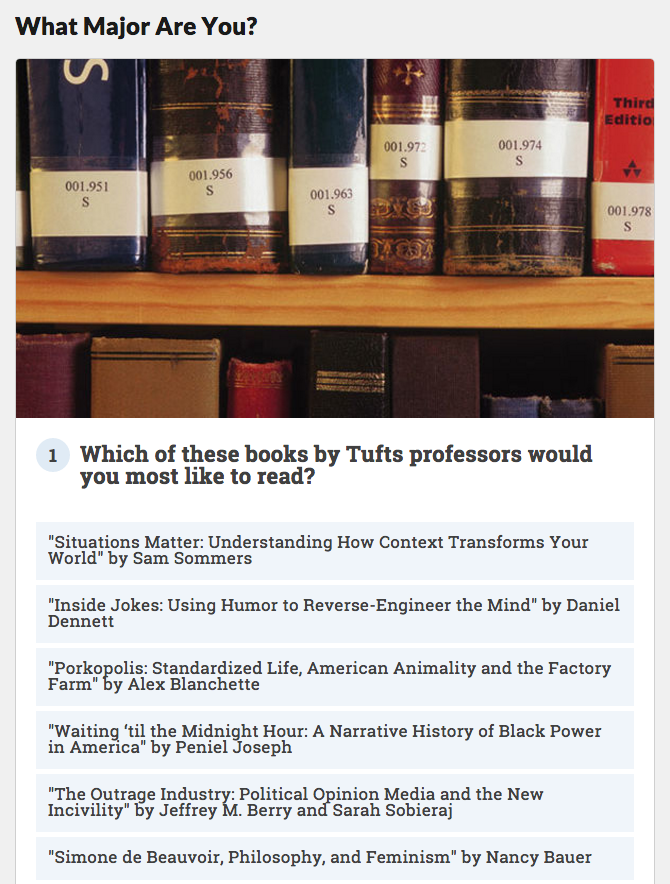
Riddle is a FREE web-based tool that allows users to create opinion polls, lists, quizzes, and personality tests. If you’re familiar with Buzzfeed (your students will be), Riddle allows you to create similar quizzes. It’s a fun and simple formative assessment tool to engage students, gather their opinions, and gauge their understanding.
Cool features of Riddle:
Templates to help you create quickly
Embed Youtube videos, and trim them to only the parts you want
Mobile-friendly, so students can use their smartphones.
30 languages available
Have option to reveal responses immediately or hide them until you’re ready
Share via hyperlink, social media, or embed into a website
Ideas for using Riddle:
Create a syllabus quiz or a “getting to know you” survey at the beginning of the semester.
Have students create lists, such as “Top 10 contributors to global warming,” to help them synthesize content or review for exams.
Incorporate a poll during class to gauge students’ comprehension of the material so you can adapt your lecture.
Ask students to create polls or quizzes to engage their classmates during presentations or discussion facilitation.
Use a quiz at the end of class as an “exit ticket”
This University of Texas professor created a top ten list of things students should know about her and her section of the university’s freshmen book club.
This quiz is about the “Space Race” between the US and the USSR during the Cold War.